---
title: Adding a Warrant in CivicRMS
description: This video will guide the user in adding an arrest warrant in CivicRMS using the warrant module and master indexes.
---
[Skip to content](https://knowledgebase.civiceye.com/knowledge-base/adding-a-warrant-in-civicrms#main-content)
English
Show submenu for translations
[Customer Portal](https://portal.civiceye.com/tickets-view?hsLang=en)
.png?width=250&height=99&name=CivicEye_Identity_Secondary%20(4).png)
Open main navigation
Close main navigation
- English
Show submenu for translations
- [Customer Portal](https://portal.civiceye.com/tickets-view)
- [Contact us](https://www.civiceye.com/support/)
[Contact us](https://www.civiceye.com/support/)
How can we help you?
- There are no suggestions because the search field is empty.
1. [CivicEye Knowledge Base](https://knowledgebase.civiceye.com/knowledge-base?hsLang=en)
2. [CivicRMS](https://knowledgebase.civiceye.com/knowledge-base/civicrms?hsLang=en)
3. [Arrest and Warrants](https://knowledgebase.civiceye.com/knowledge-base/civicrms?hsLang=en#arrest-and-warrants)
August 24, 2026
# Adding a Warrant in CivicRMS
## This video will guide the user in adding an arrest warrant in CivicRMS using the warrant module and master indexes.
# [Adding a Warrant in CivicRMS](https://app.guidde.com/playbooks/rWsT7Kjynp3uxFZcvYtA8E)
This training video will guide the user through the process of adding a warrant in CivicRMS.
### Go to [training-rms.civiceye.com](https://training-rms.civiceye.com)
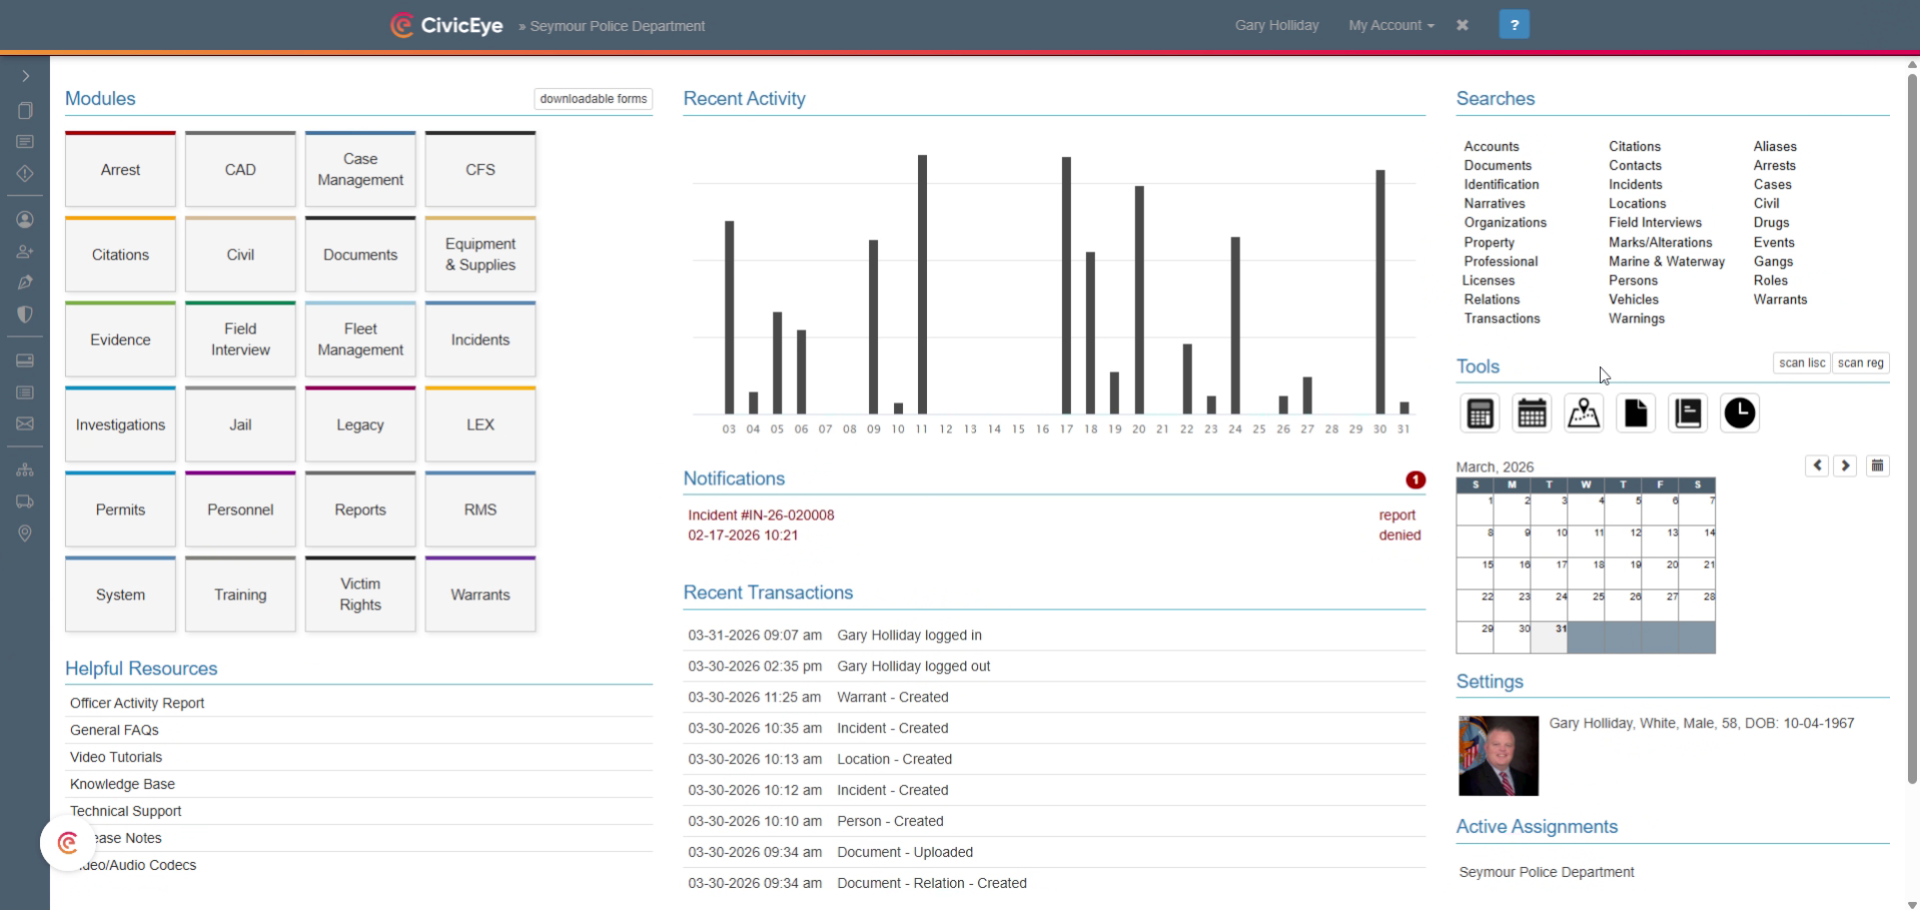
### 1. Dashboard
This video will guide the user in adding an arrest warrant in CivicRMS using the warrant module and master indexes.
### 2. Access Warrants Section
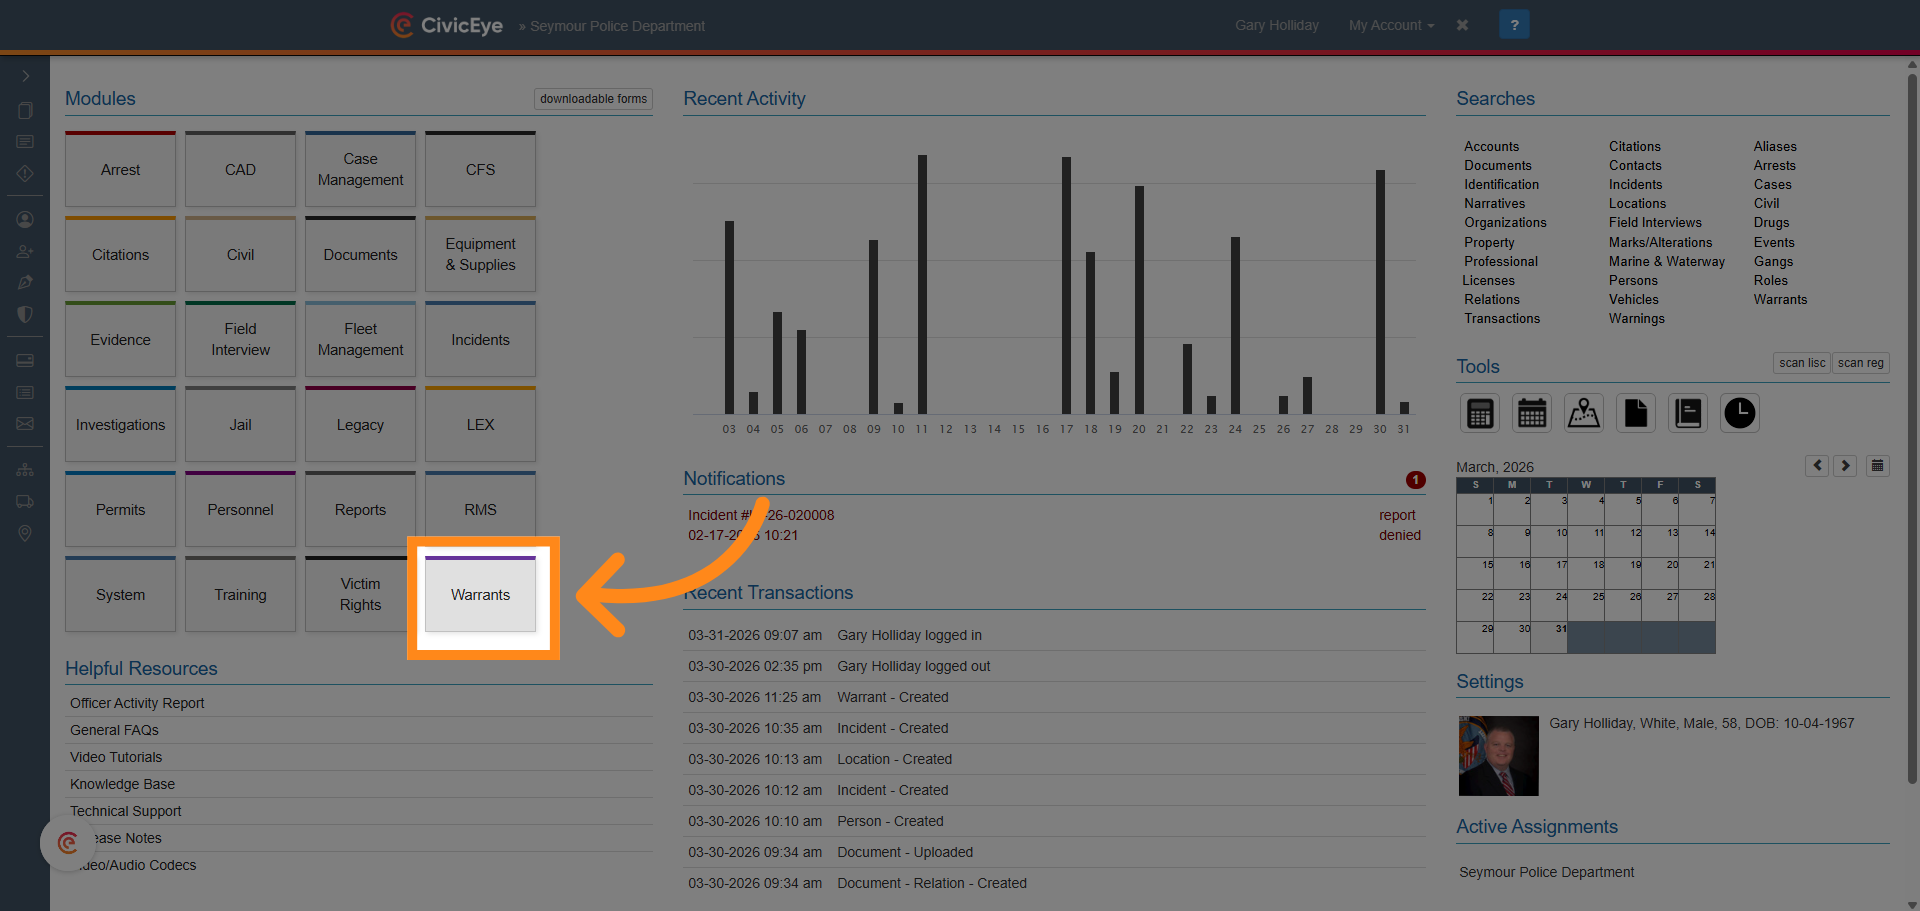
In the main CivicRMS dashboard, select the Warrant Module
### 3. Warrant Module
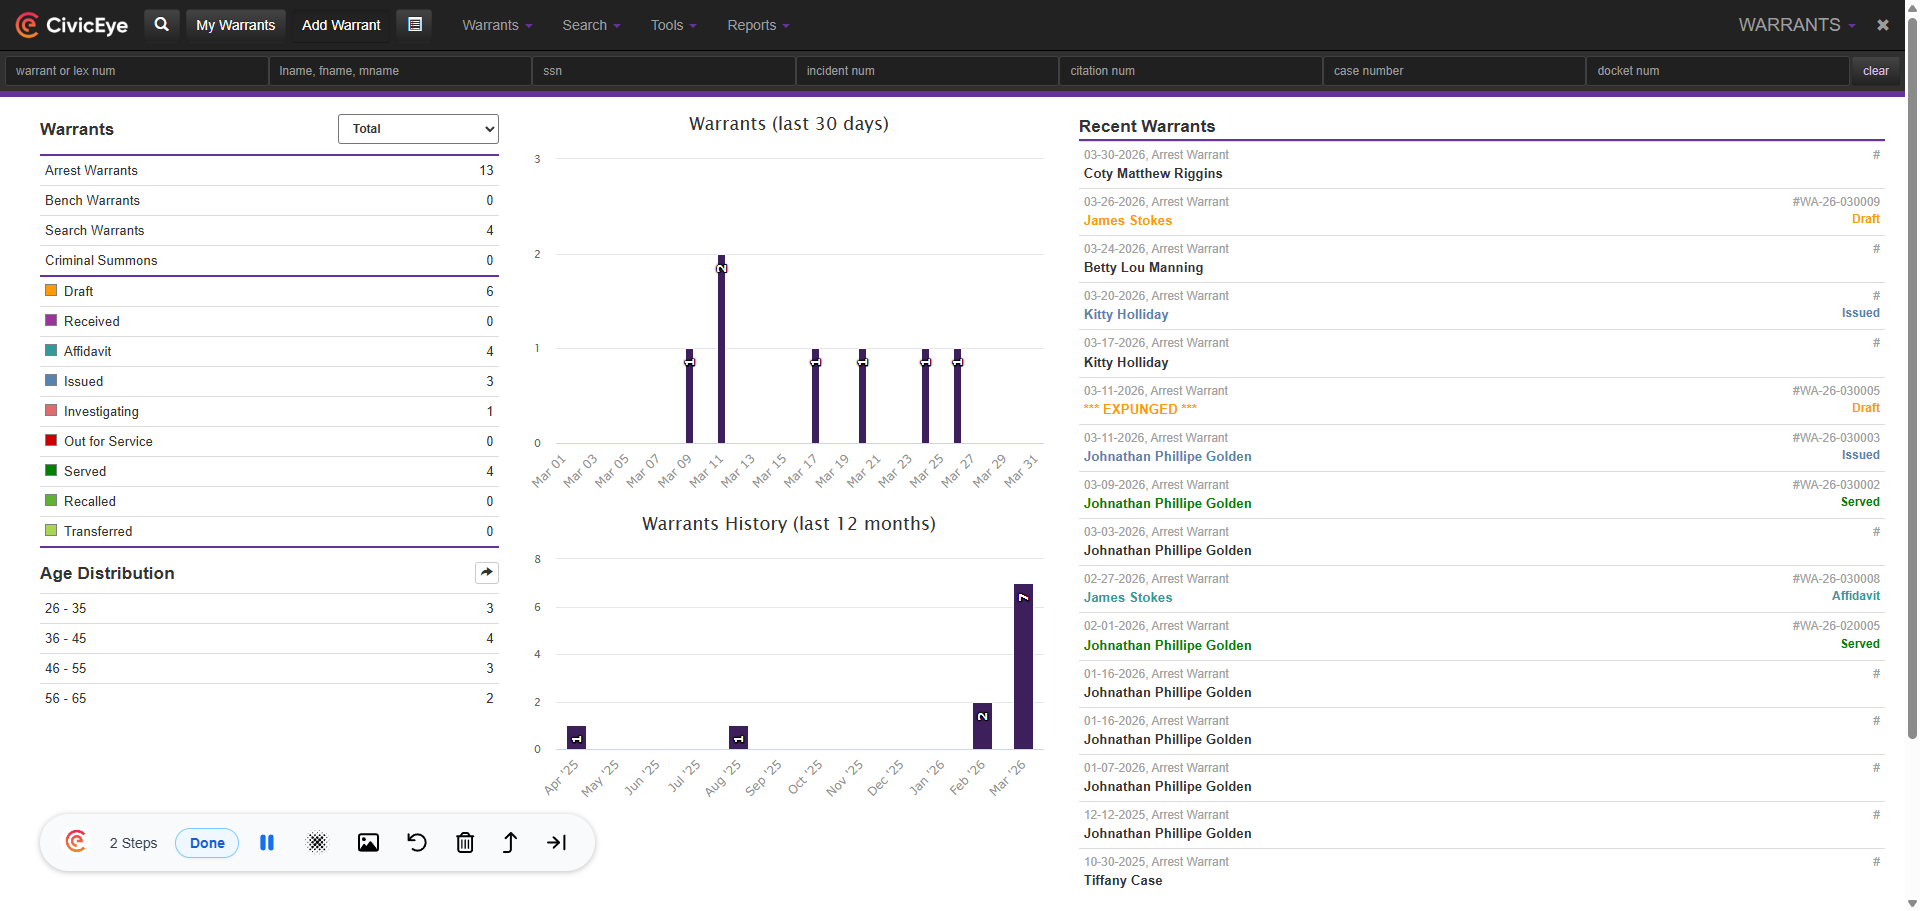
Selecting Warrant from the main CivicRMS dashboard opens the Warrant Module, which gives the user up to date information on recent warrants and warrant activity.
### 4. Add Warrant
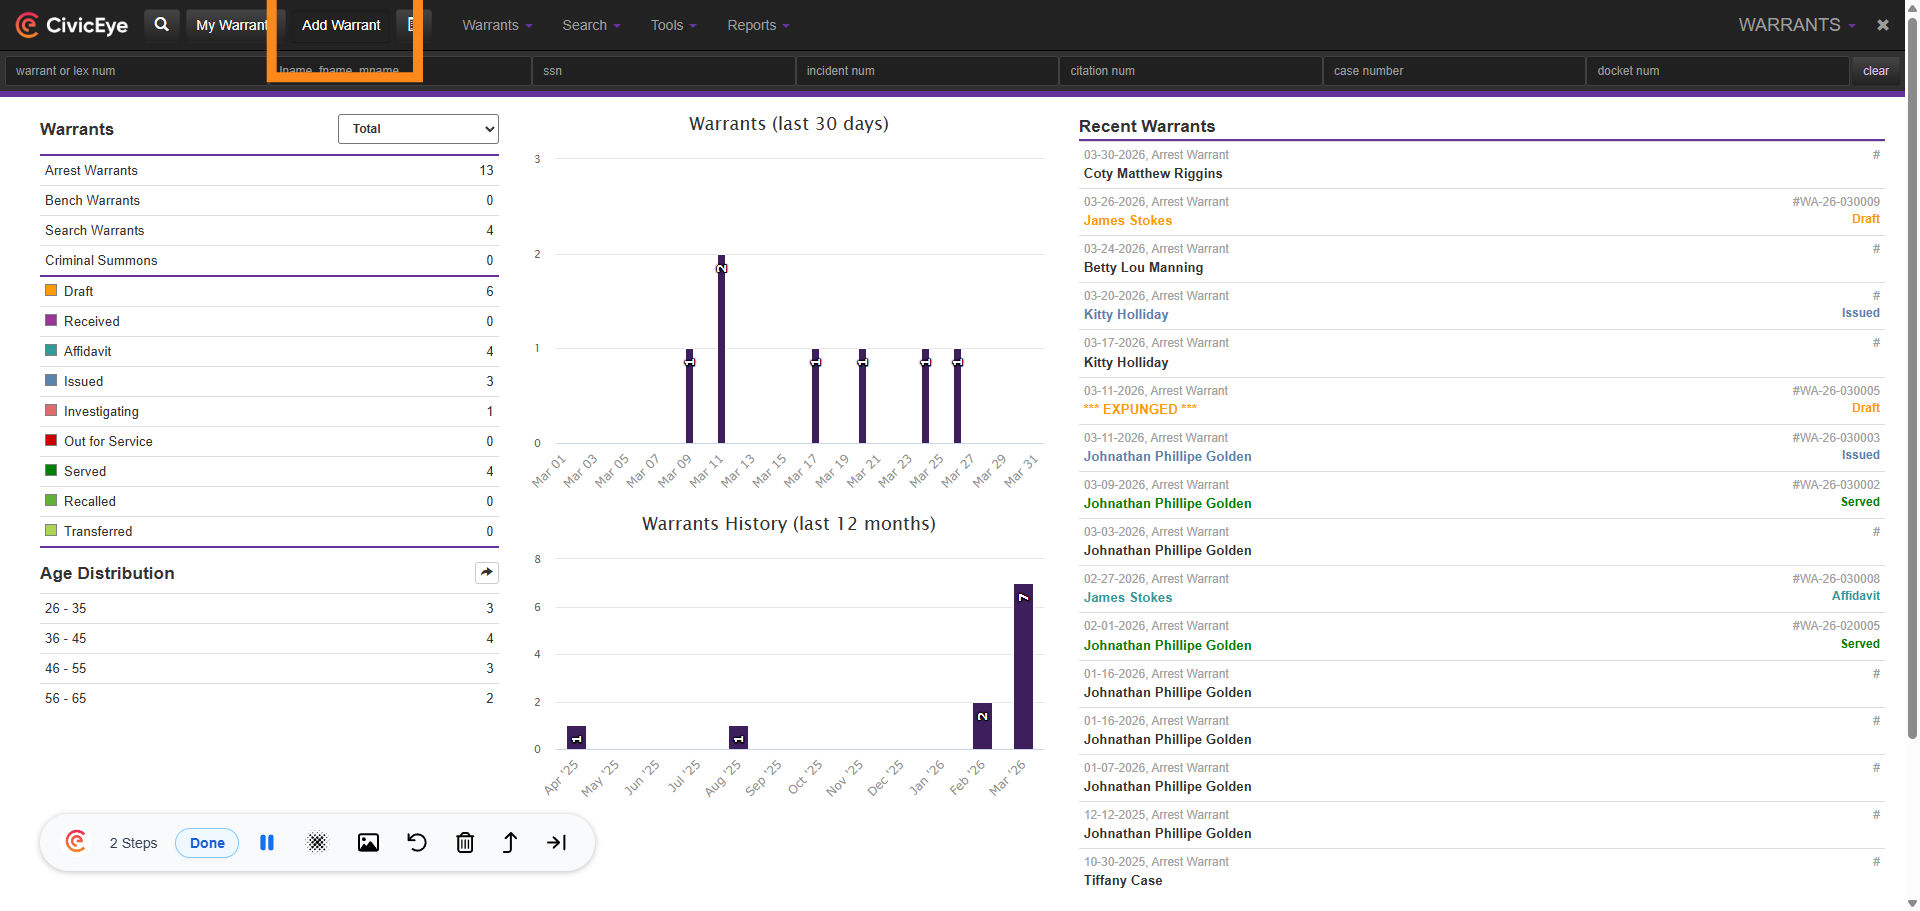
To begin the warrant process, in the Warrant Module dashboard, select add warrant.
### 5. Add New Warrant
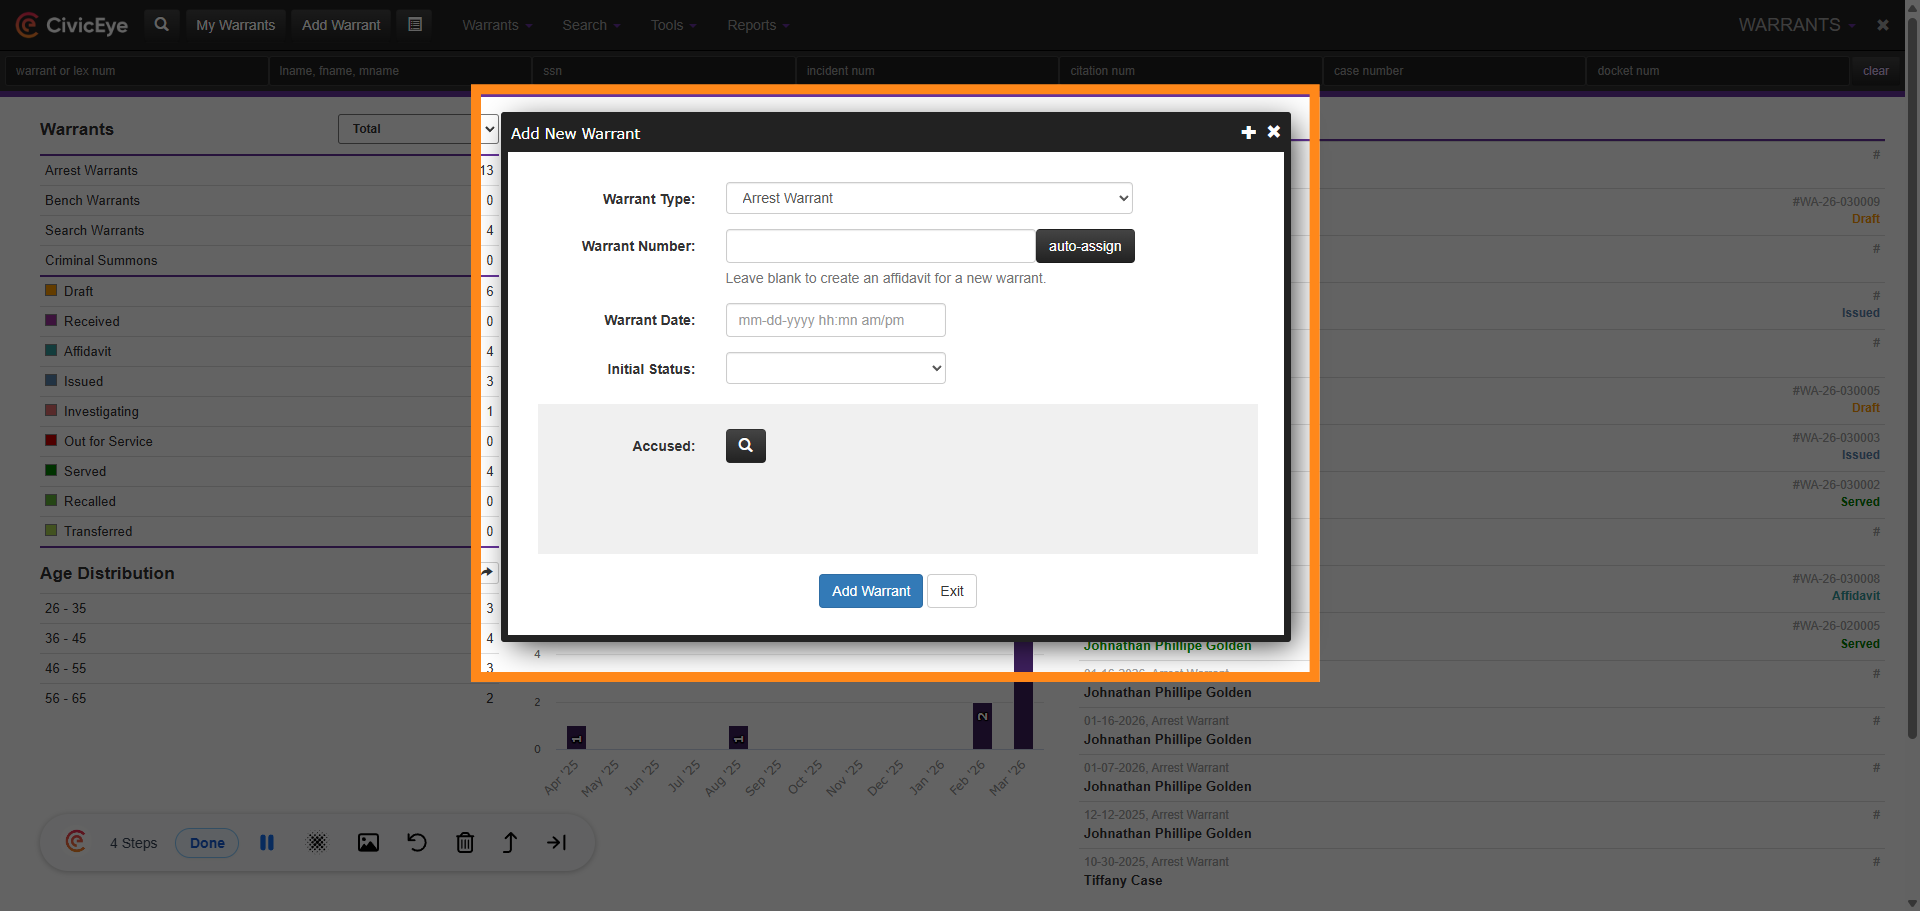
Selecting add warrant opens the add new warrant frame. This area allows the user to add the warrant type, warrant number, warrant date, initial status, and the defendant.
### 6. Adding Defendant
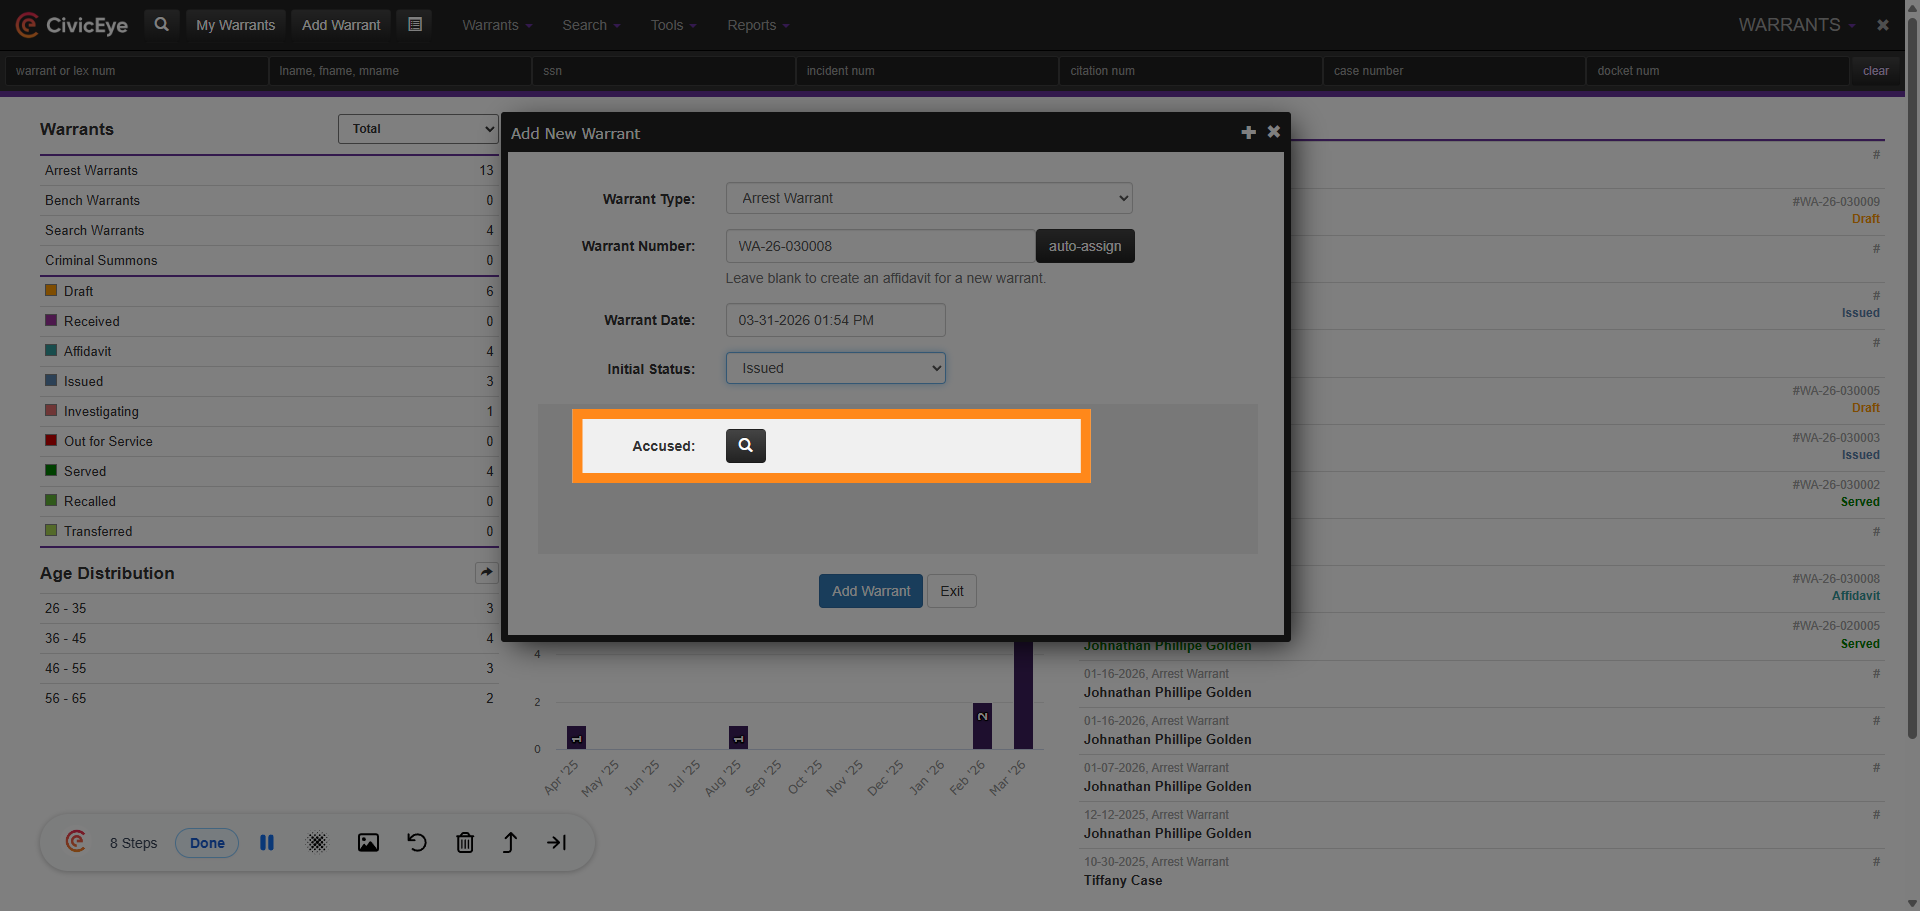
CivicRMS uses the master name index to add the defendant to the warrant. Select the magnifying glass to open the person search.
### 7. Search For Defendant
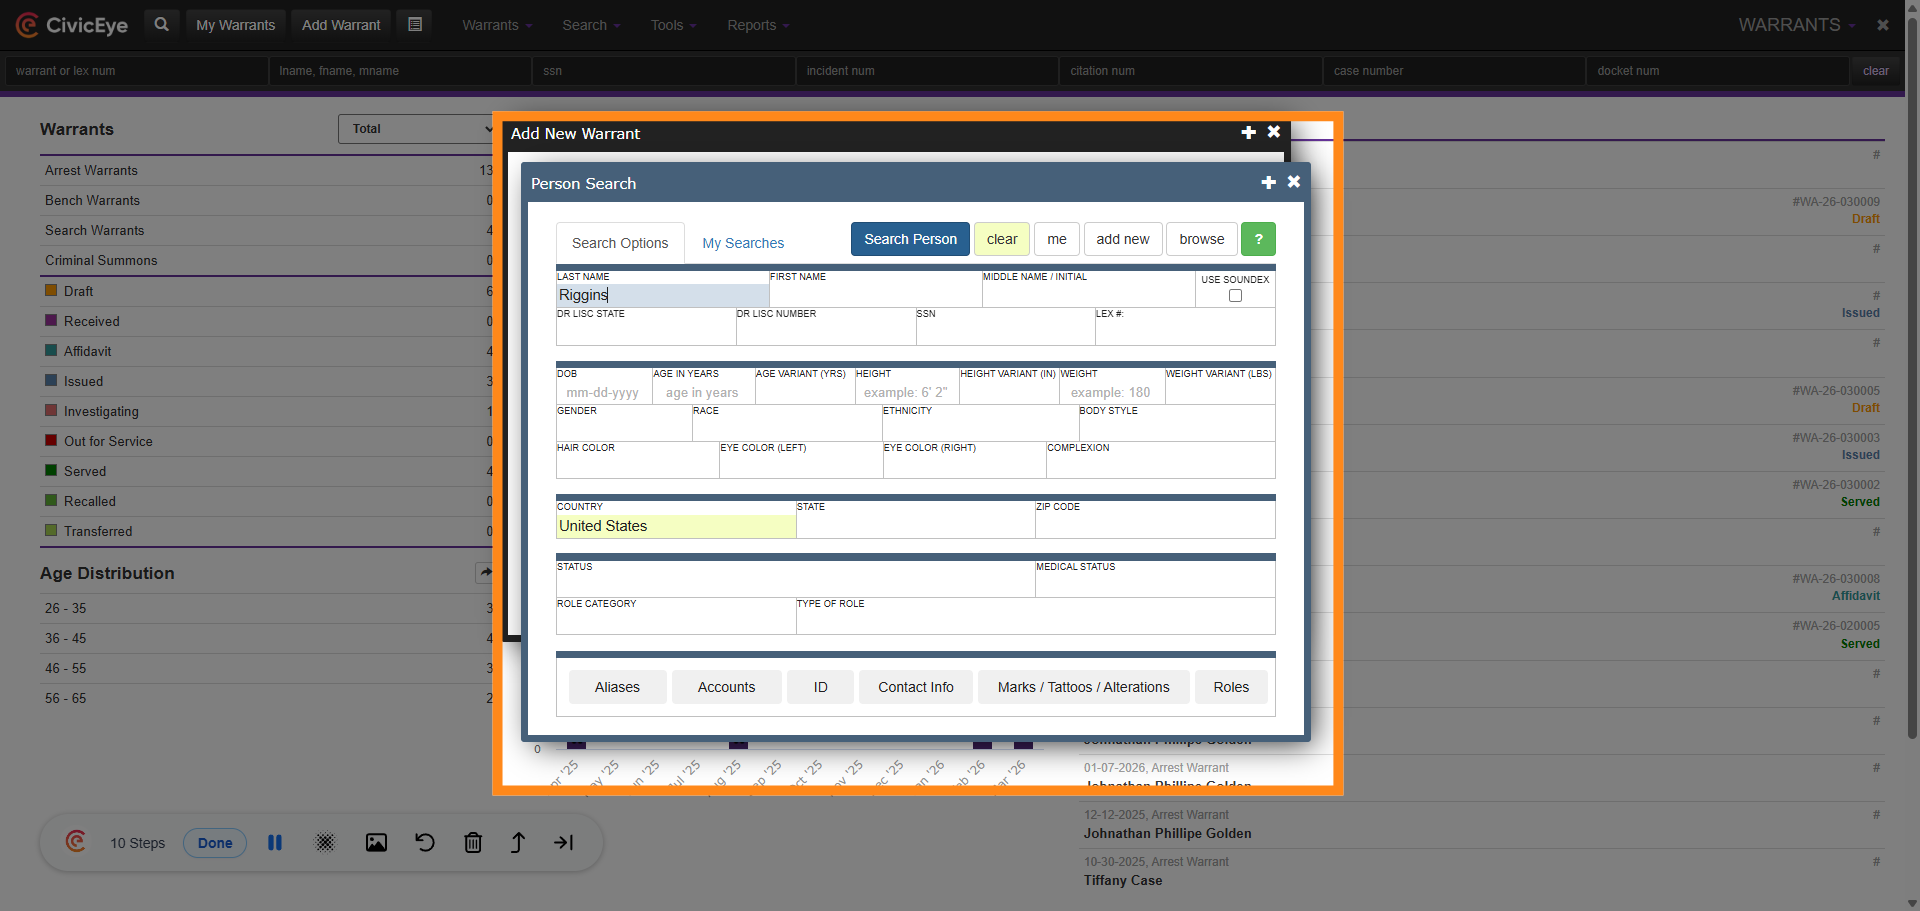
Use the person search feature to locate the master record for the defendant. Enter the name and other known data into the proper filters and select search person.
### 8. Select Person Record
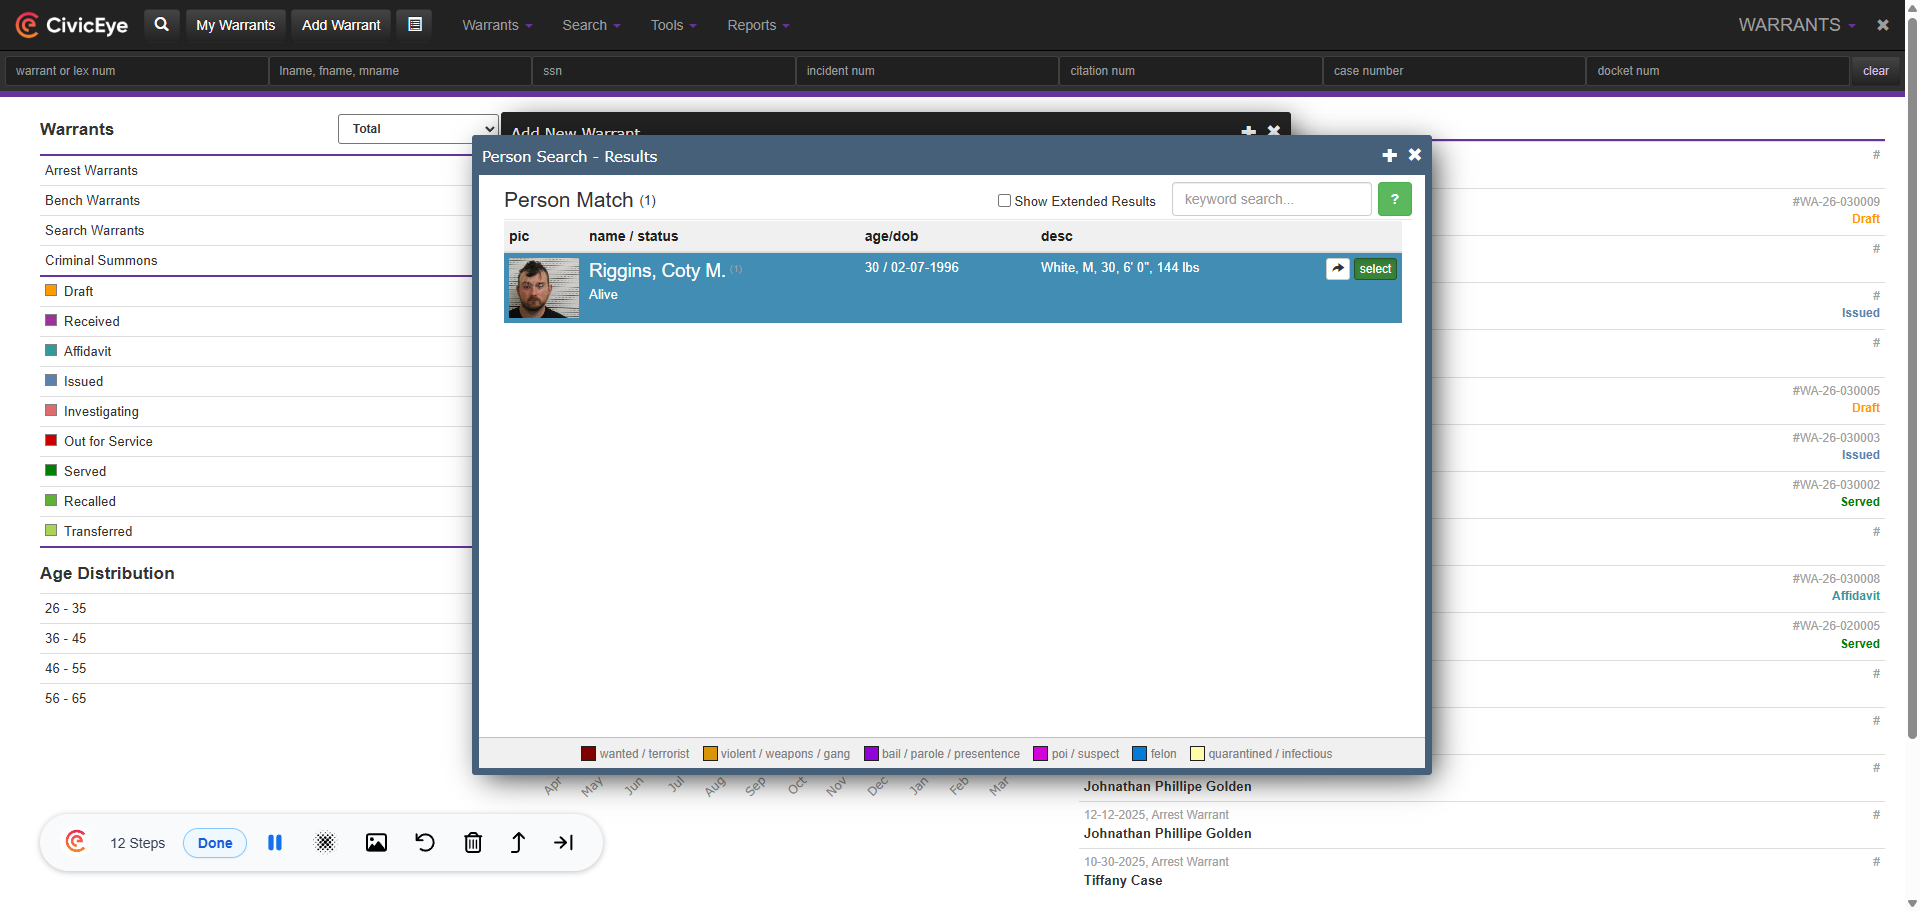
Identify the correct defendant from the master name search, and hit select. This captures the defendants information to populate the warrant.
### 9. Defendant Added
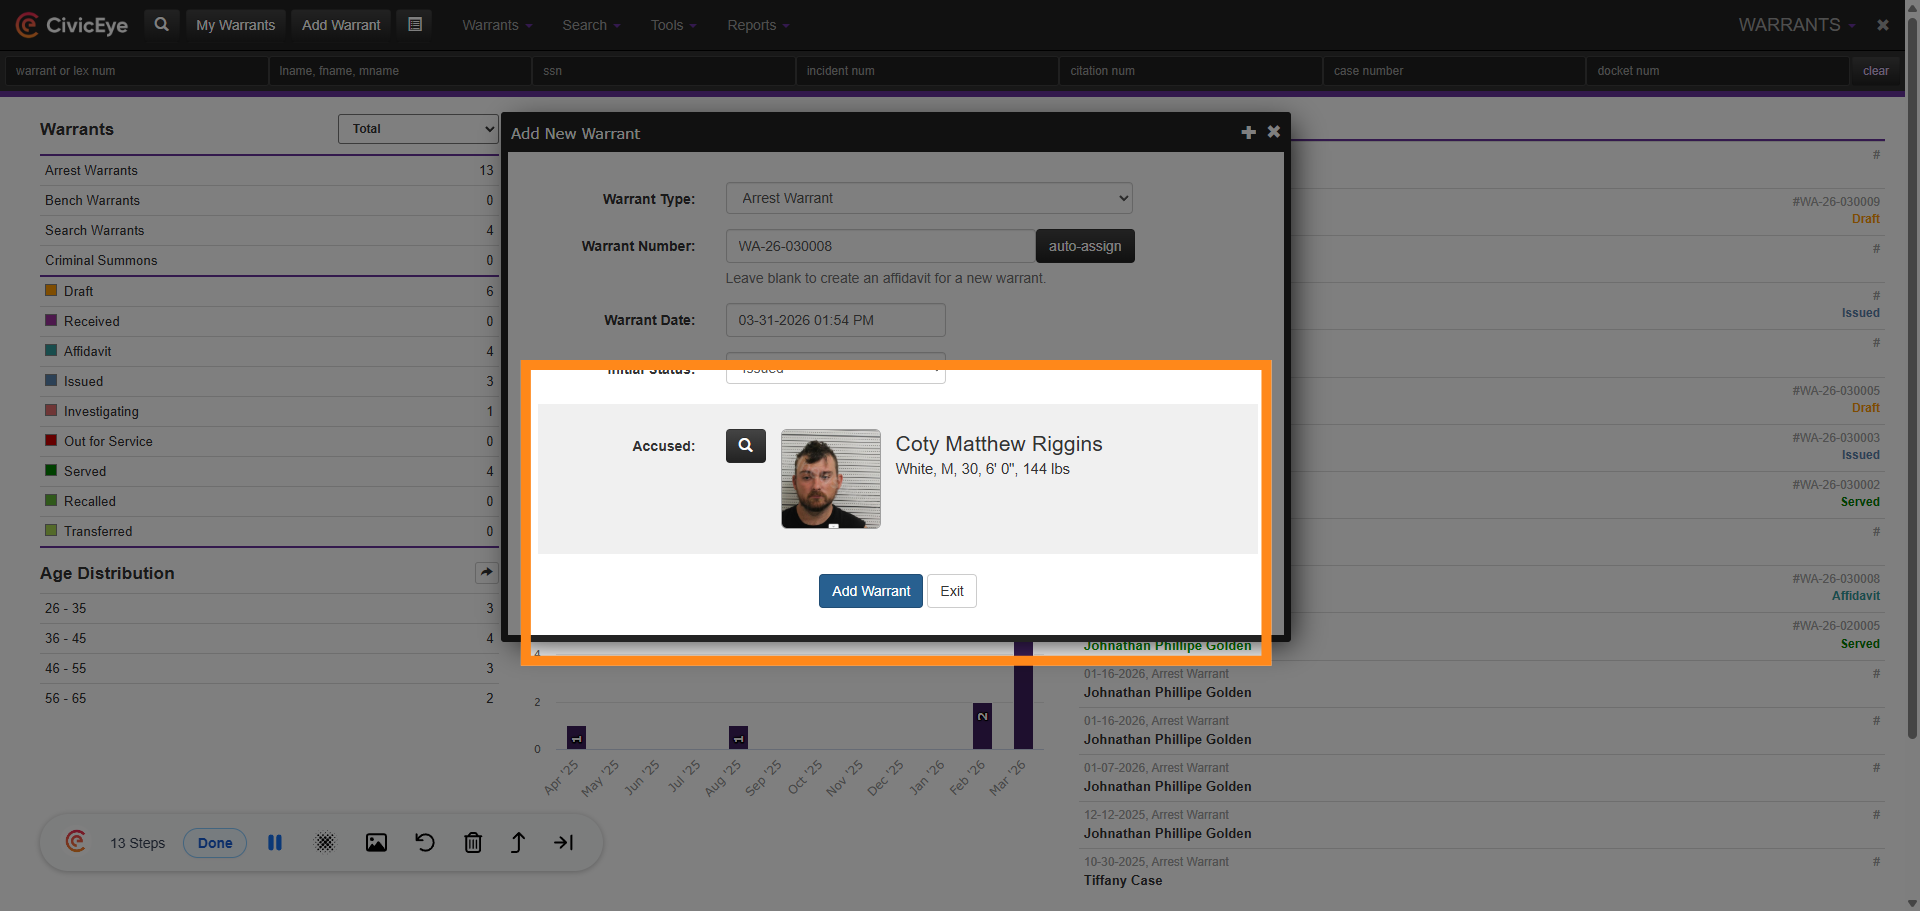
The defendant is now included in the add new warrant page, and that information will populate to the warrant. Select add warrant to begin filling out the body of the warrant.
### 10. Body of Warrant
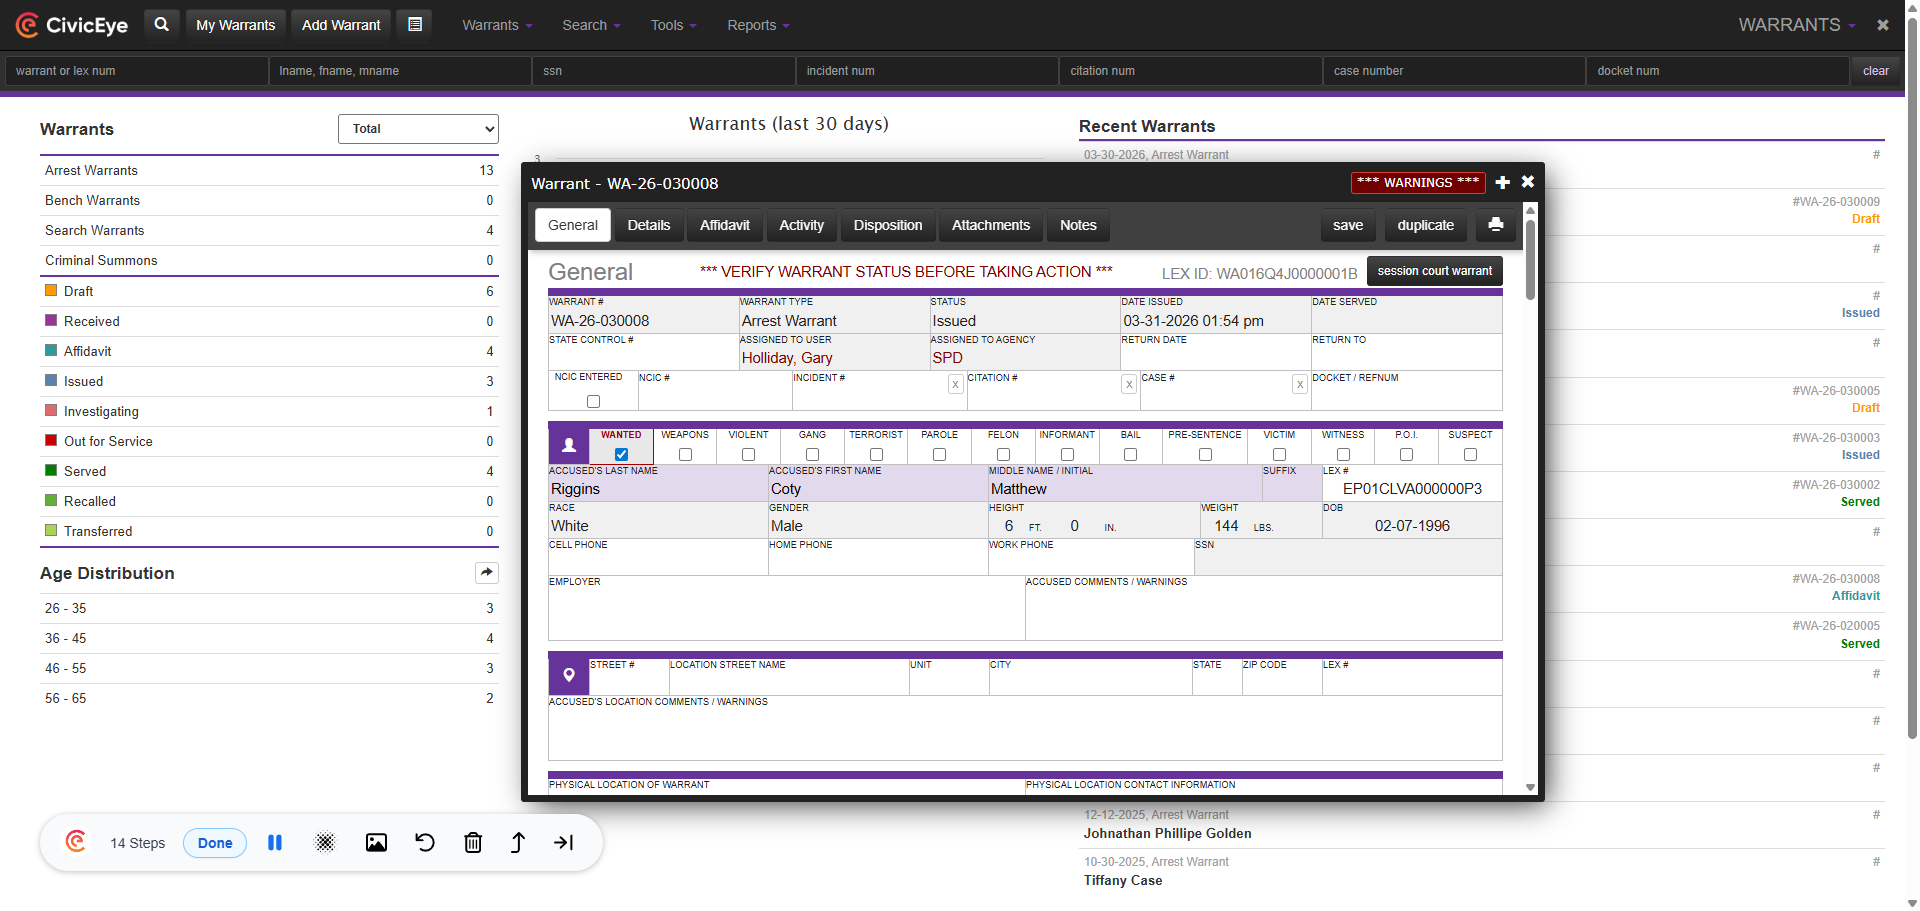
Selecting add warrant has now opened up the body of the warrant with the defendants name and information included. Review all the defendant information and be sure to add address and phone numbers.
### 11. Add Charge
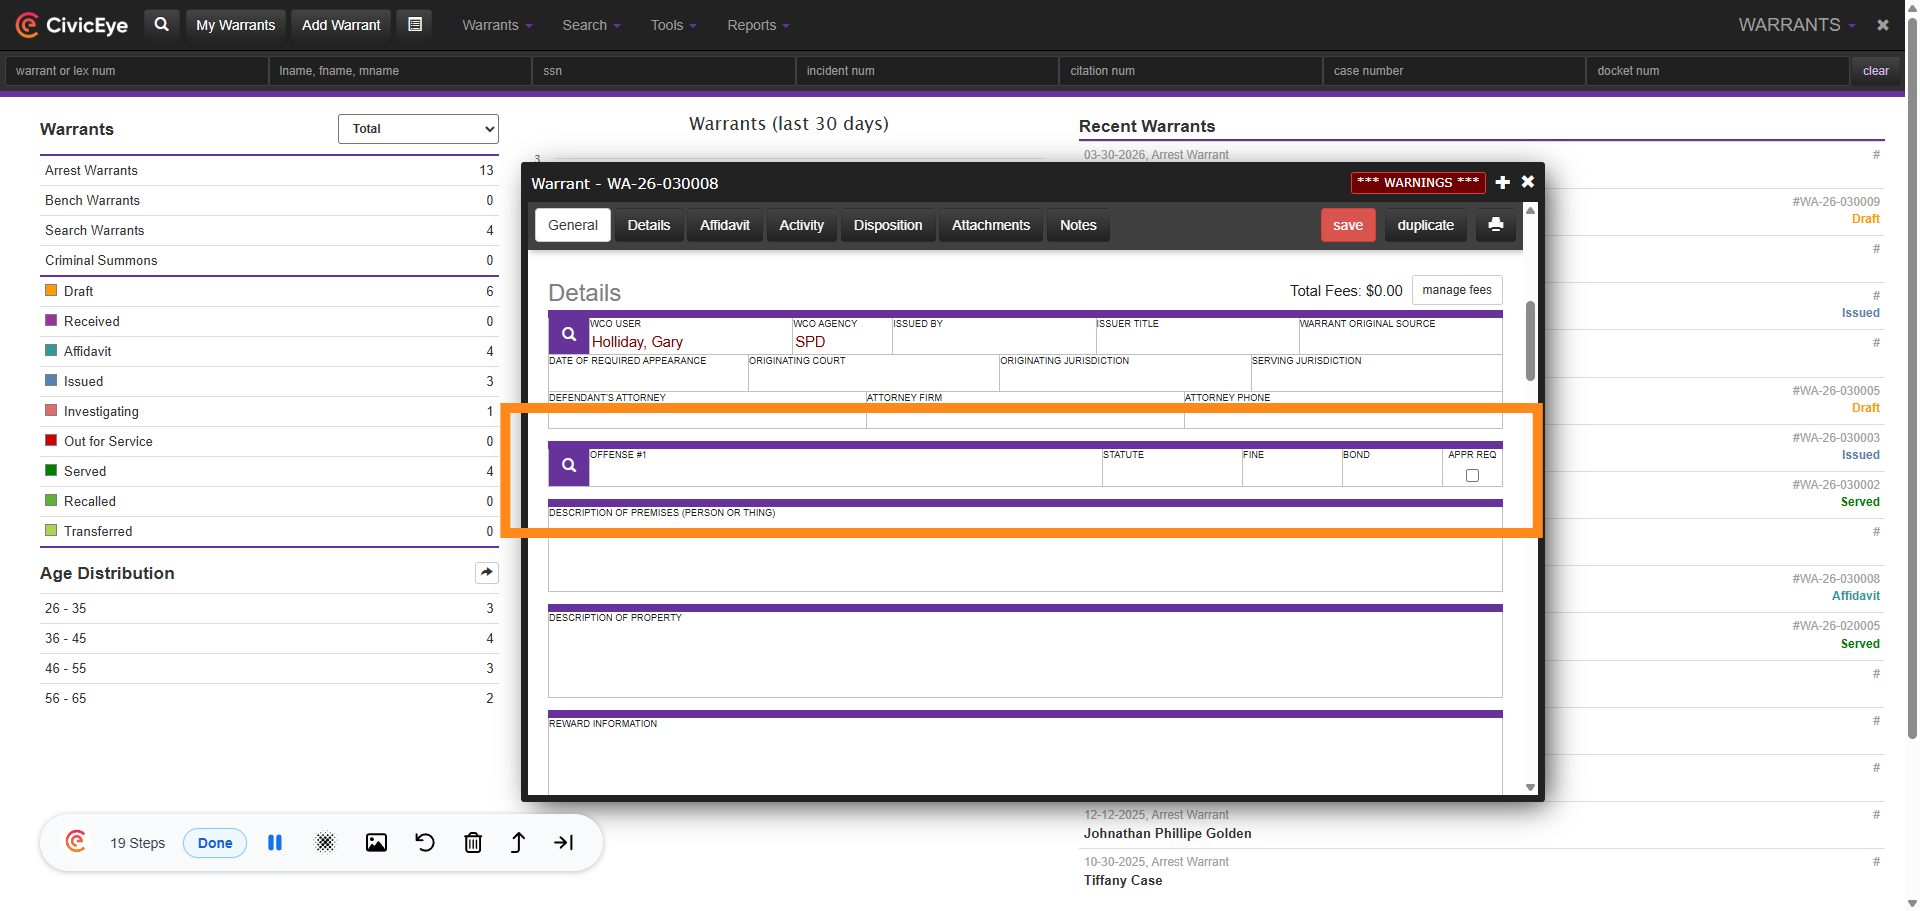
In the warrant details section, add the arrest charge in the offense section using the dropdown charge feature.
### 12. Affidavit
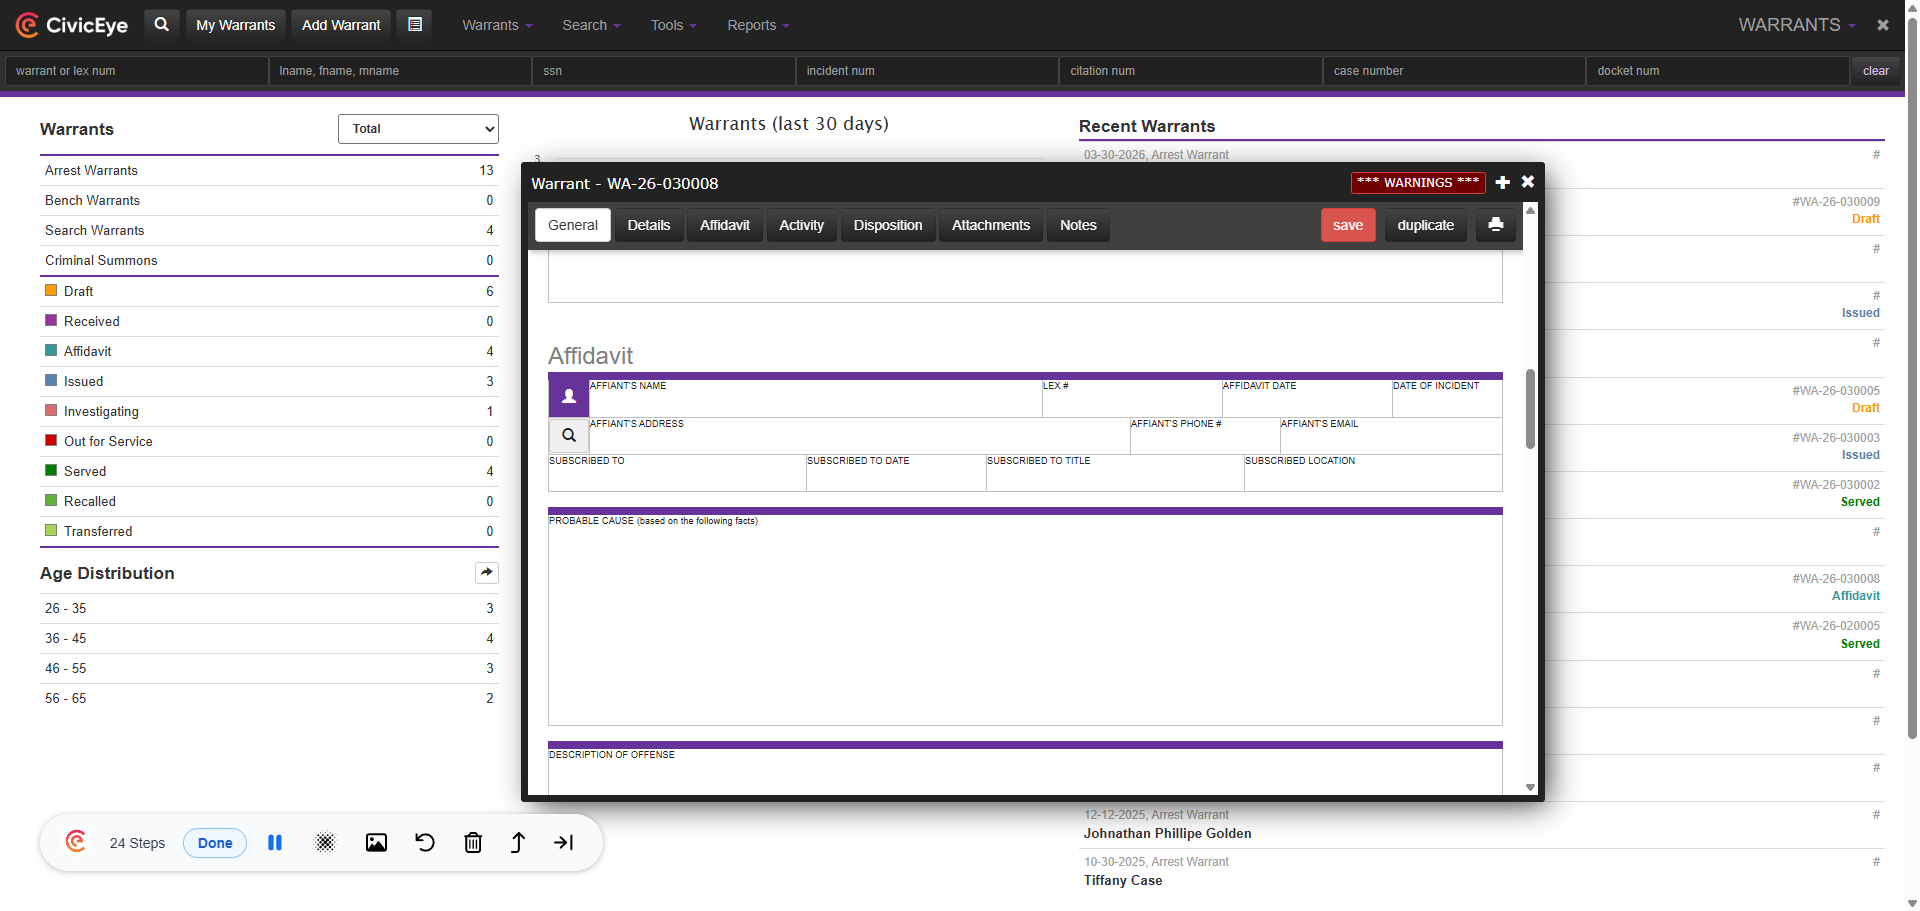
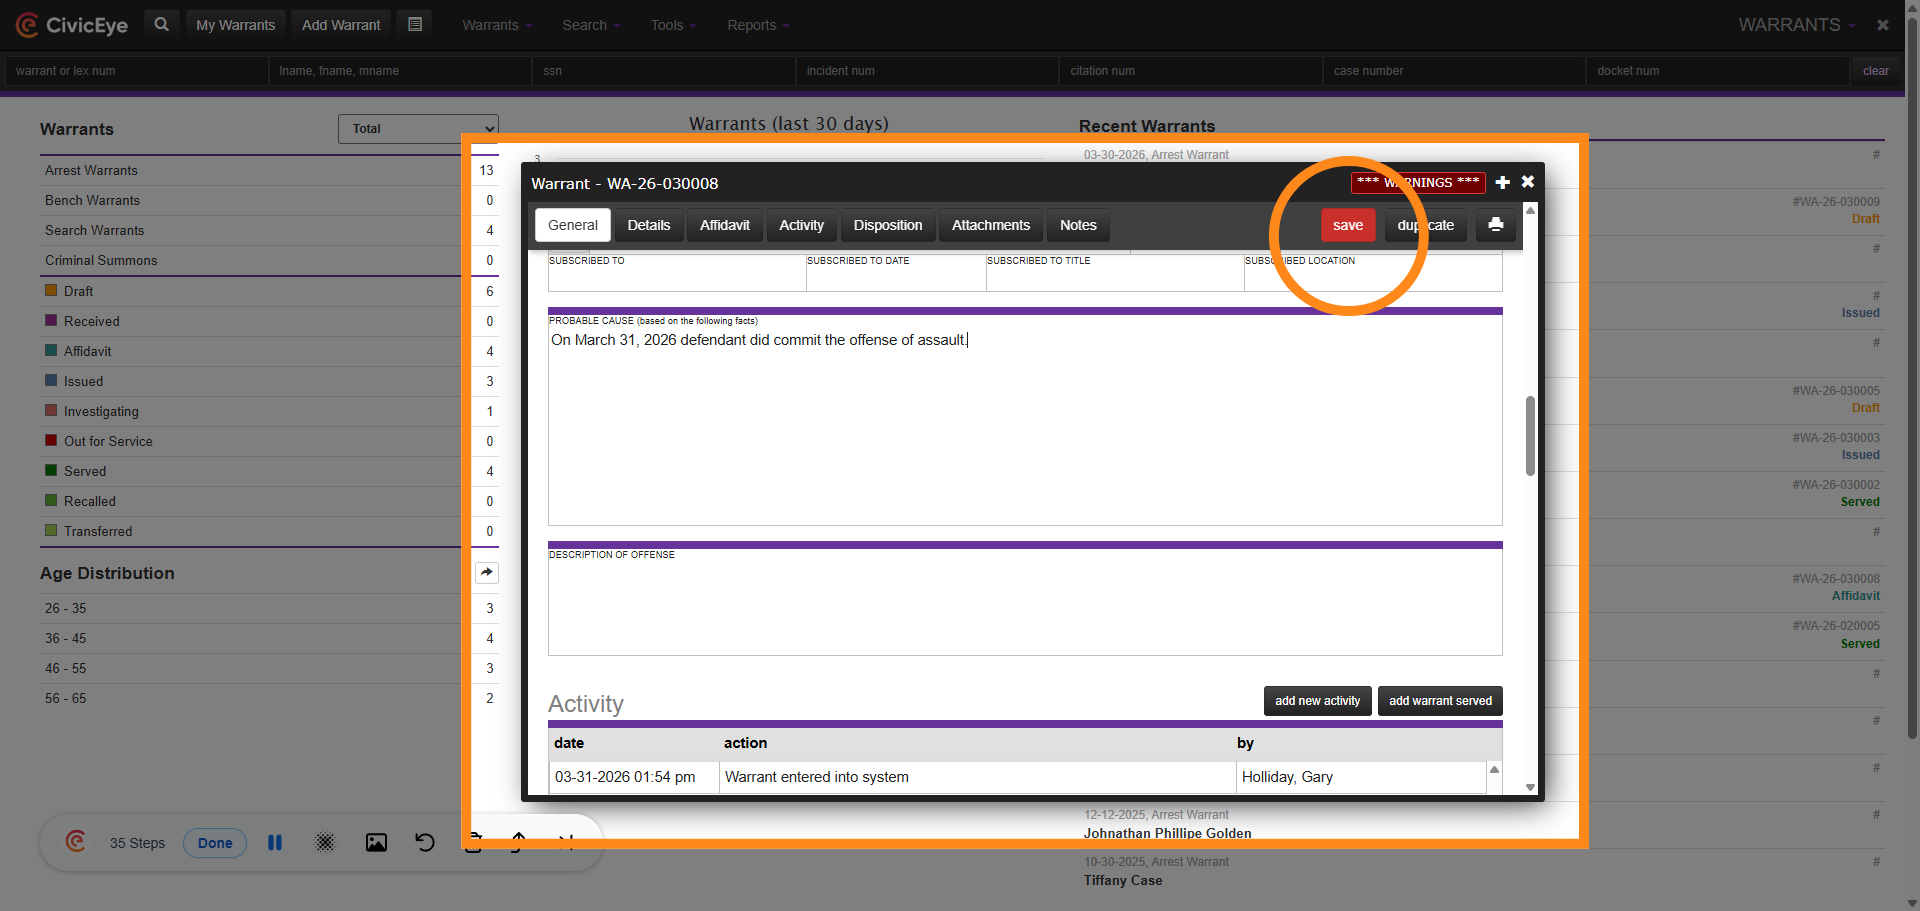
In the Affidavit section of the warrant, add the affiant using the master name search. Once the affiant is added, the user can document their affidavit in the provided section.
### 13. Review and Save
After completing all the required sections, reviewing the defendant and affiant section, and the supporting affidavit, select save. This will also add the warrant to the mast warrant index.
### 14. Print Warrant
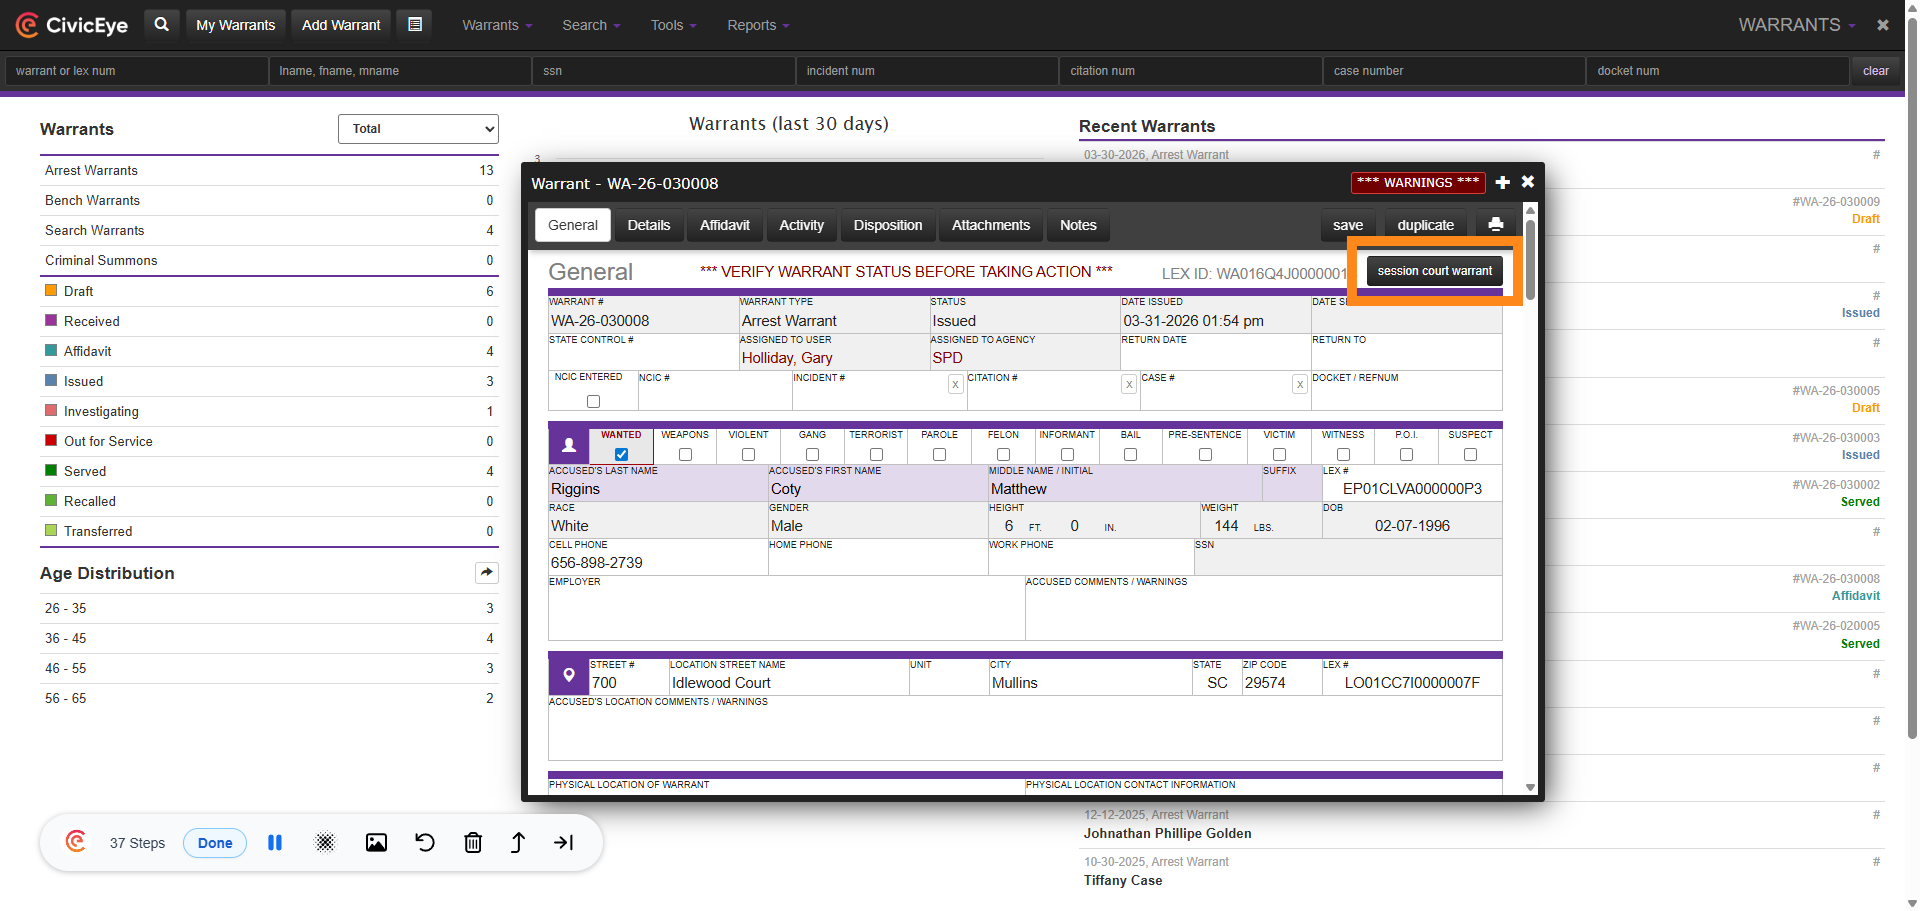
If your agency prints or transmits formatted copies for signature, select the sessions court warrant button to review and print the formatted warrant.
### 15. Warrant
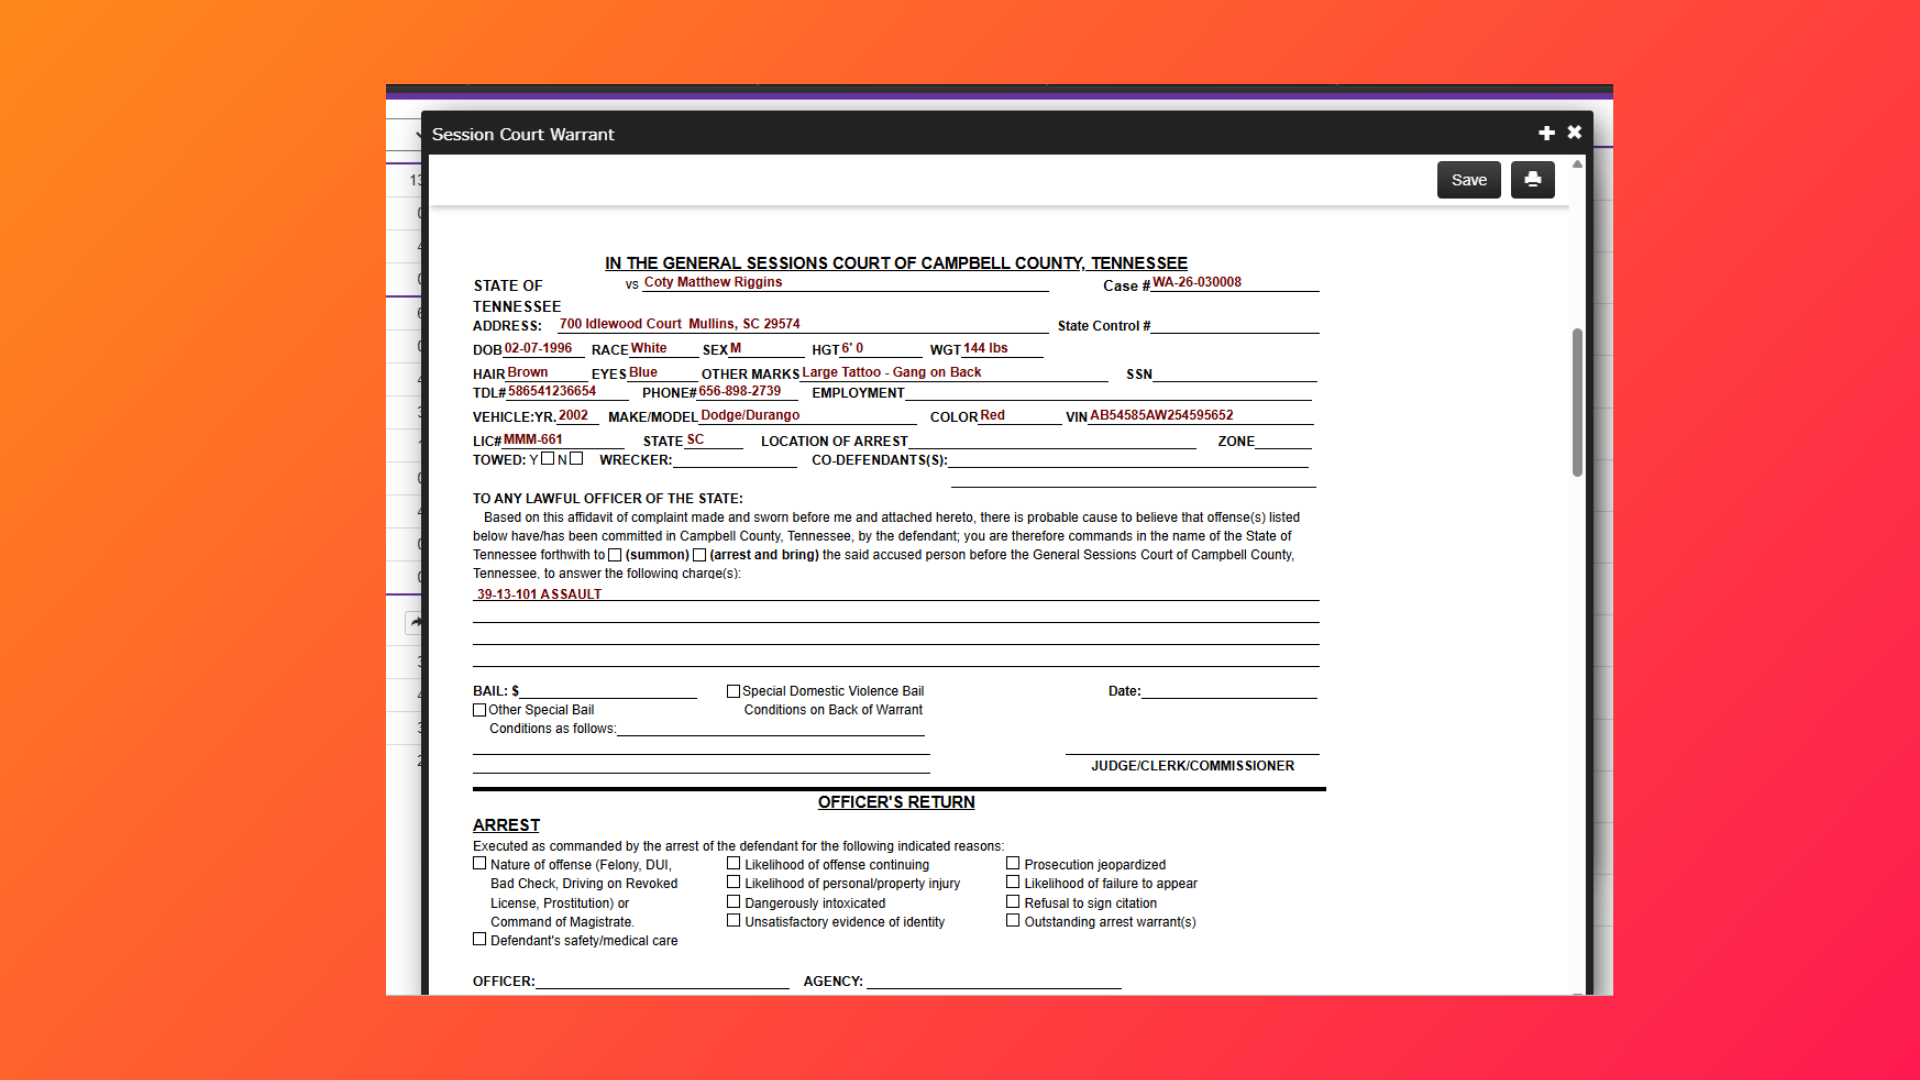
Review the formatted warrant to ensure the correct information has populated and that all required fields have been completed. Edits can be made to the warrant and saved in this format prior to printing.
### 16. Warrant
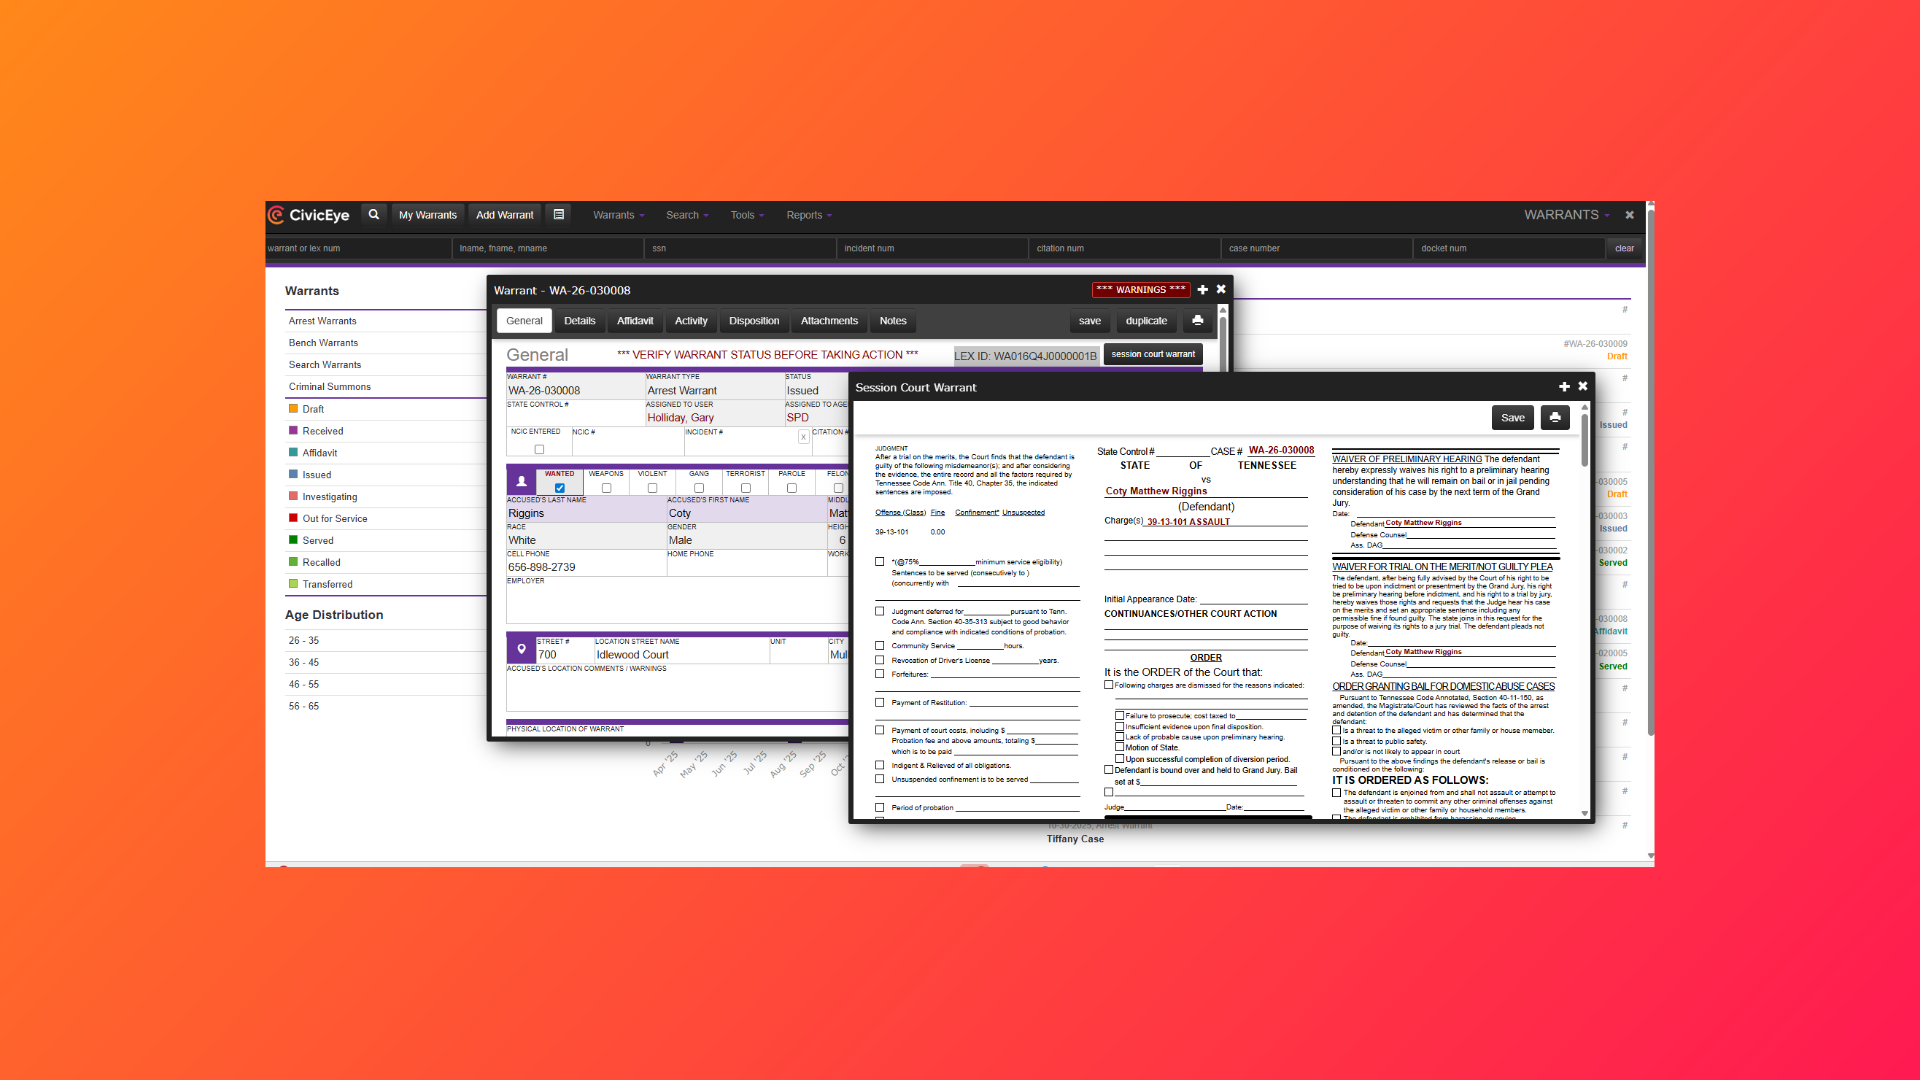
The warrant has now been added to the warrant database, and an active wanted warning will appear on the defendants master name file until the warrant is served. Ensure that personnel keep the warrant status updated as well as the final warrant disposition.
Thank you for your attention, and for watching this instructional guide on adding warrants to CivicRMS. Please call or email with any questions or concerns at 877-778-5277 or support@civiceye.com.
[Powered by **guidde**](https://www.guidde.com)
- [How to Request New Training Content](https://knowledgebase.civiceye.com/knowledge-base/how-to-request-new-training-content?hsLang=en)
- [CivicCase](https://knowledgebase.civiceye.com/knowledge-base/civiccase?hsLang=en#main-content)
- [Prosecutor and Admin Portals](https://knowledgebase.civiceye.com/knowledge-base/civiccase?hsLang=en#prosecutor-and-admin-portals)
- [CivicDocs](https://knowledgebase.civiceye.com/knowledge-base/civicdocs?hsLang=en#main-content)
- [Evidence Management](https://knowledgebase.civiceye.com/knowledge-base/civicdocs?hsLang=en#evidence-management)
- [User Access](https://knowledgebase.civiceye.com/knowledge-base/civicdocs?hsLang=en#user-access)
- [Defense Portal](https://knowledgebase.civiceye.com/knowledge-base/civicdocs?hsLang=en#defense-portal)
- [Law Enforcement Portal](https://knowledgebase.civiceye.com/knowledge-base/civicdocs?hsLang=en#law-enforcement-portal)
- [CivicRMS](https://knowledgebase.civiceye.com/knowledge-base/civicrms?hsLang=en#main-content)
- [Master Index](https://knowledgebase.civiceye.com/knowledge-base/civicrms?hsLang=en#master-index)
- [Incident Reports](https://knowledgebase.civiceye.com/knowledge-base/civicrms?hsLang=en#incident-reports)
- [NIBRS](https://knowledgebase.civiceye.com/knowledge-base/civicrms?hsLang=en#nibrs)
- [Property](https://knowledgebase.civiceye.com/knowledge-base/civicrms?hsLang=en#property)
- [Persons](https://knowledgebase.civiceye.com/knowledge-base/civicrms?hsLang=en#persons)
- [Arrest and Warrants](https://knowledgebase.civiceye.com/knowledge-base/civicrms?hsLang=en#arrest-and-warrants)
- [General](https://knowledgebase.civiceye.com/knowledge-base/civicrms?hsLang=en#general)
- [FAQs](https://knowledgebase.civiceye.com/knowledge-base/faqs?hsLang=en#main-content)
- [Support](https://knowledgebase.civiceye.com/knowledge-base/faqs?hsLang=en#support)
- [Training](https://knowledgebase.civiceye.com/knowledge-base/faqs?hsLang=en#training)
- [Support](https://knowledgebase.civiceye.com/knowledge-base/support?hsLang=en#main-content)
- [User Access / Permissions](https://knowledgebase.civiceye.com/knowledge-base/support?hsLang=en#user-access-permissions)
- [Getting started](https://knowledgebase.civiceye.com/knowledge-base/getting-started?hsLang=en#main-content)
- [CivicEye Personnel Module](https://knowledgebase.civiceye.com/knowledge-base/getting-started?hsLang=en#civiceye-personnel-module)
[.png?width=250&height=99&name=CivicEye_Identity_Secondary%20(4).png)](https://knowledgebase.civiceye.com/?hsLang=en)
The Platform for Public Safety
[mailto:help@civiceye.com](mailto:help@civiceye.com)
Copyright © 2025, CivicEye