---
title: Add a Party to an Incident Report in Civiceye
description: Add a Party to an Incident Report in CivicRMS
---
[Skip to content](https://knowledgebase.civiceye.com/knowledge-base/add-a-party-to-an-incident-report-in-civiceye#main-content)
English
Show submenu for translations
[Customer Portal](https://portal.civiceye.com/tickets-view?hsLang=en)
.png?width=250&height=99&name=CivicEye_Identity_Secondary%20(4).png)
Open main navigation
Close main navigation
- English
Show submenu for translations
- [Customer Portal](https://portal.civiceye.com/tickets-view)
- [Contact us](https://www.civiceye.com/support/)
[Contact us](https://www.civiceye.com/support/)
How can we help you?
- There are no suggestions because the search field is empty.
1. [CivicEye Knowledge Base](https://knowledgebase.civiceye.com/knowledge-base?hsLang=en)
2. [CivicRMS](https://knowledgebase.civiceye.com/knowledge-base/civicrms?hsLang=en)
3. [Incident Reports](https://knowledgebase.civiceye.com/knowledge-base/civicrms?hsLang=en#incident-reports)
August 24, 2026
# Add a Party to an Incident Report in Civiceye
## This tutorial guides you through adding a party to an incident report in CivicRMS.
# [Add a Party to an Incident Report in Civiceye](https://app.guidde.com/playbooks/uYdhpGXNHPtRpEAUpbnEfP)
This tutorial guides you through adding a party to an incident report in CivicRMS.
### Go to [training-rms.civiceye.com](https://training-rms.civiceye.com)
### 1. Incident Report
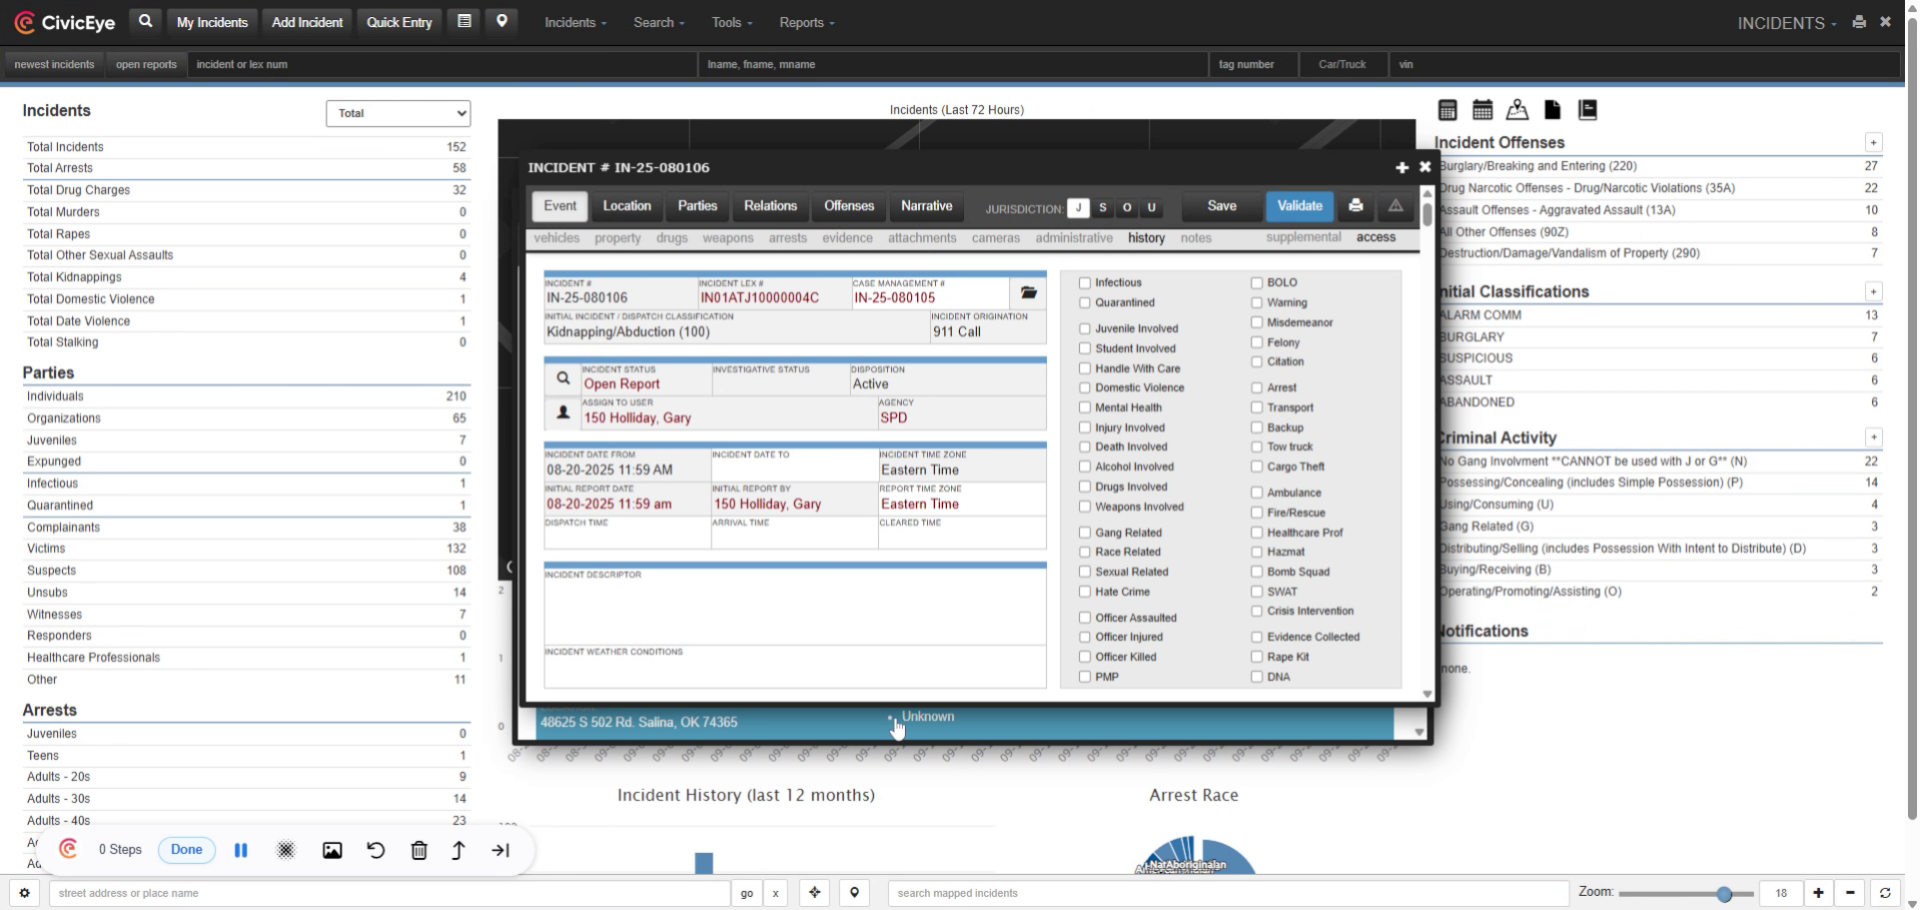
From the main CivicRMS dashboard, open the incident module. Open an incident report, either a new or report in progress.
### 2. Select Parties
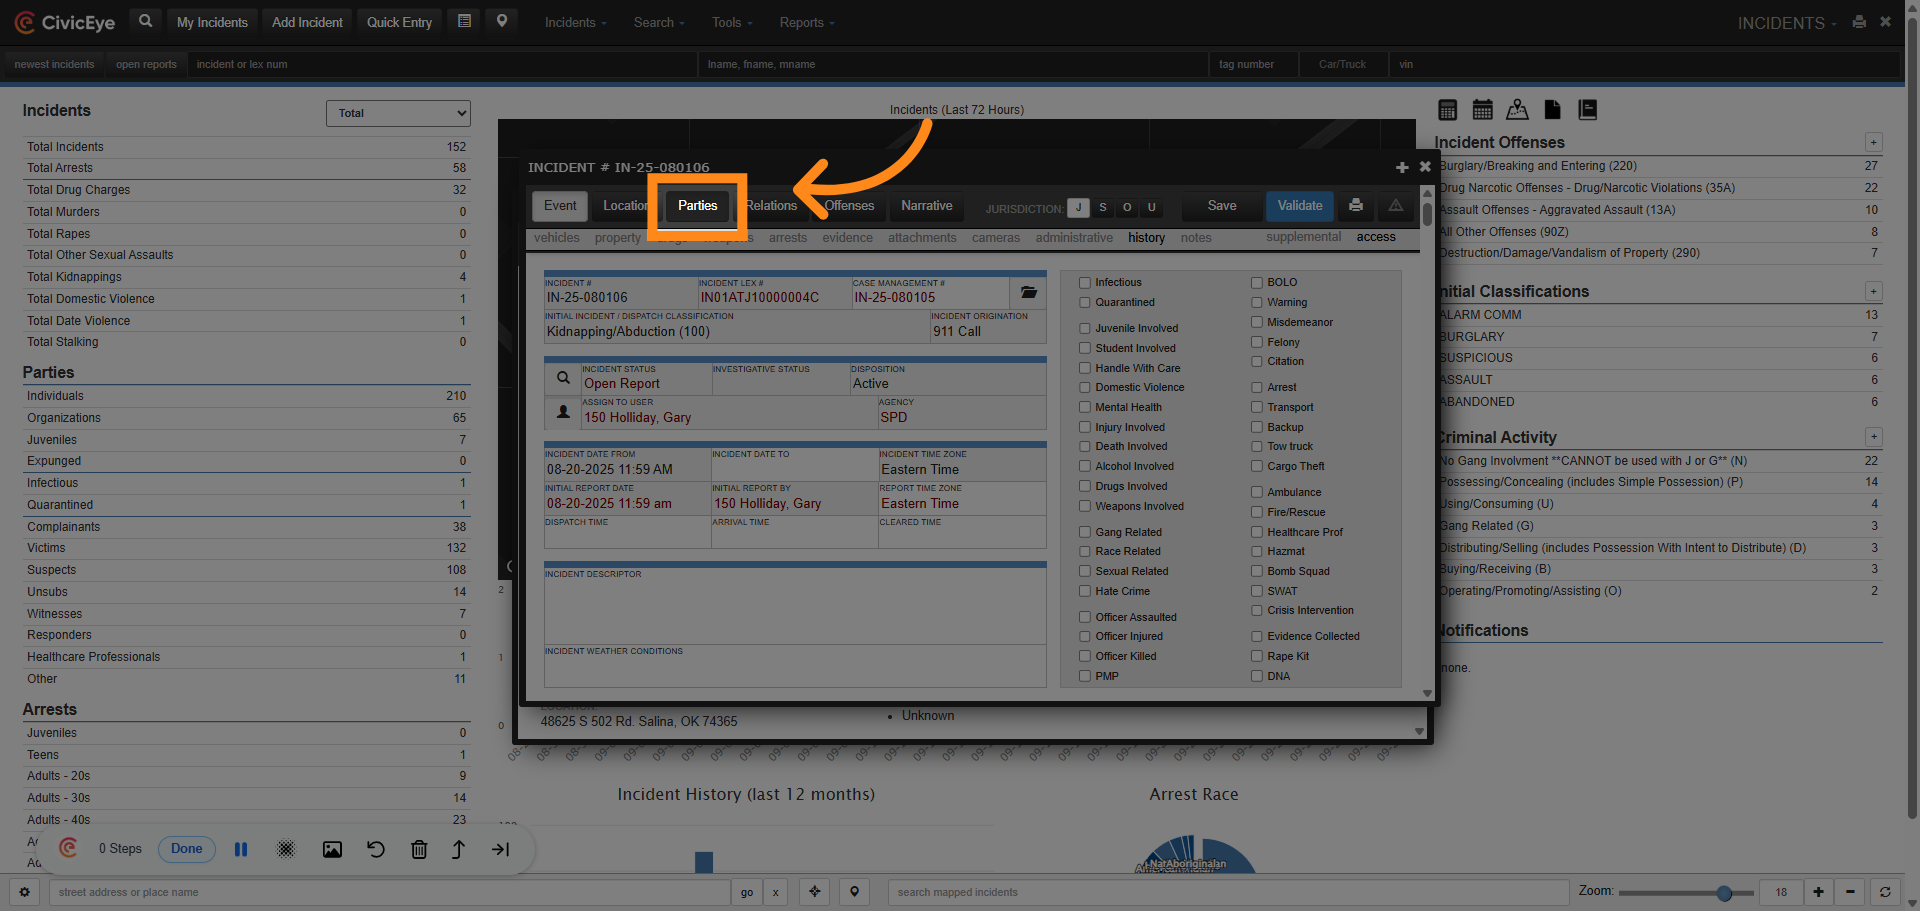
In the upper tab banner of the report, select the Parties tab.
### 3. Select Add Party
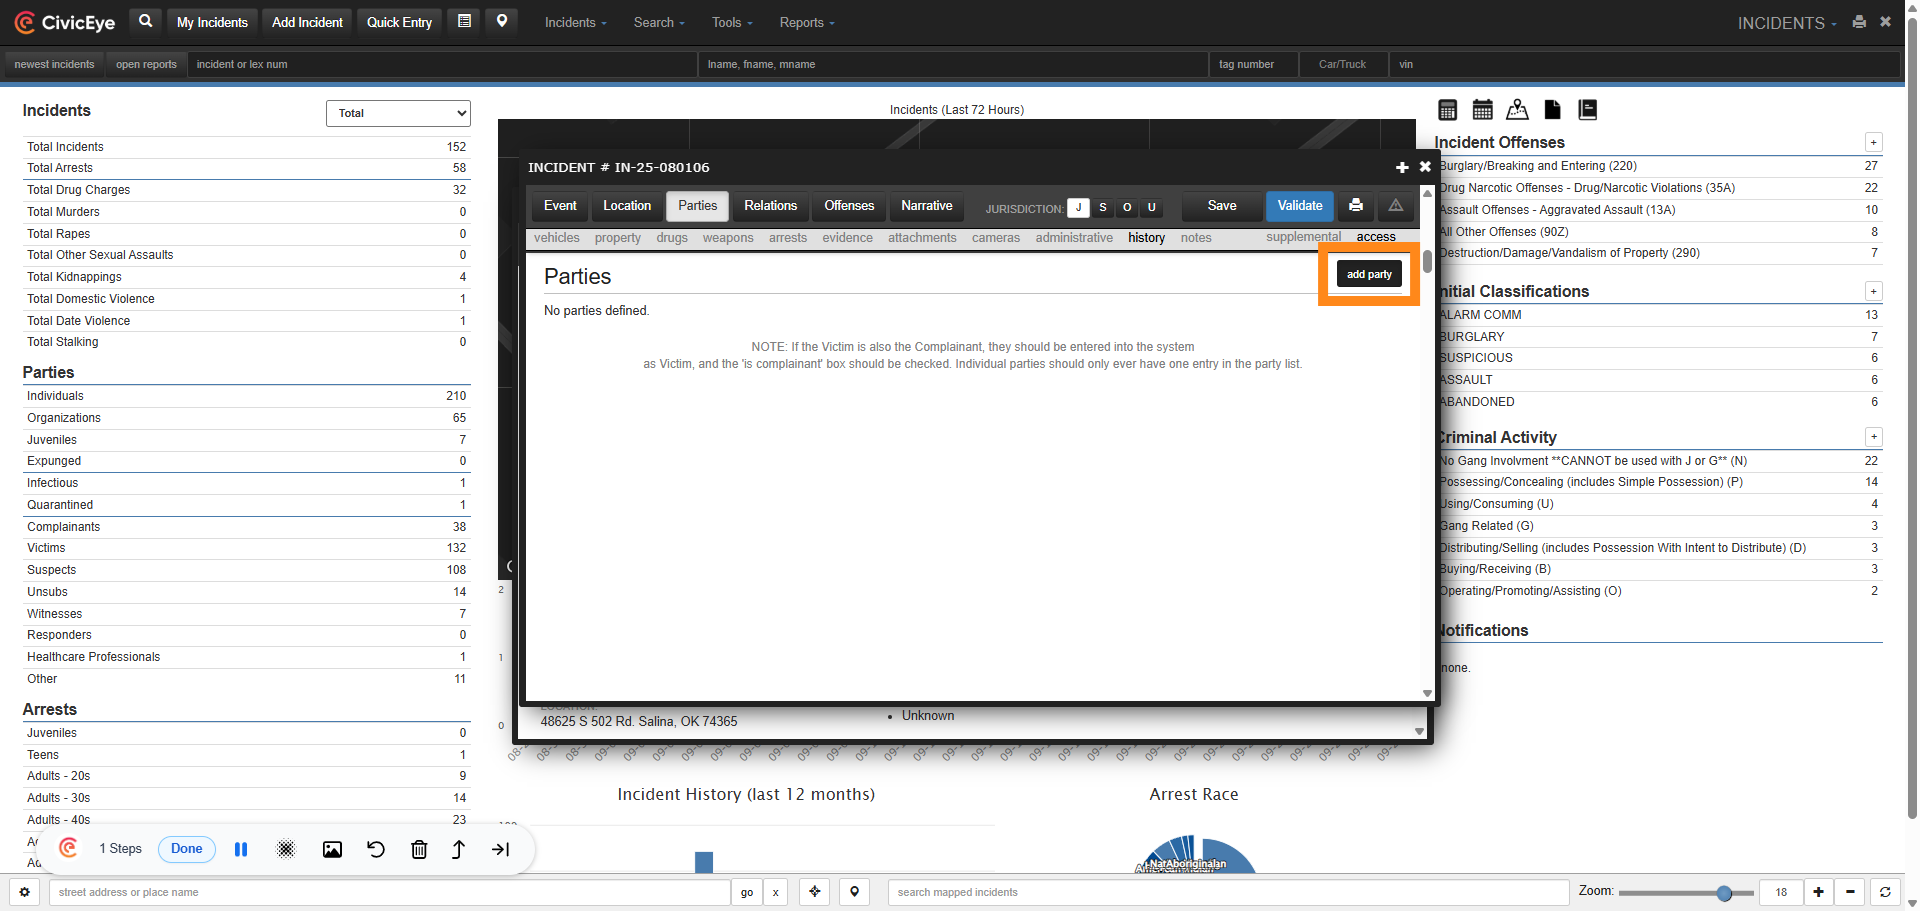
Selecting the Parties tab opens the report parties page. In this page you will add information on all persons associated with this investigation. To add a party, select the add party tab.
### 4. Click "Known Suspect"
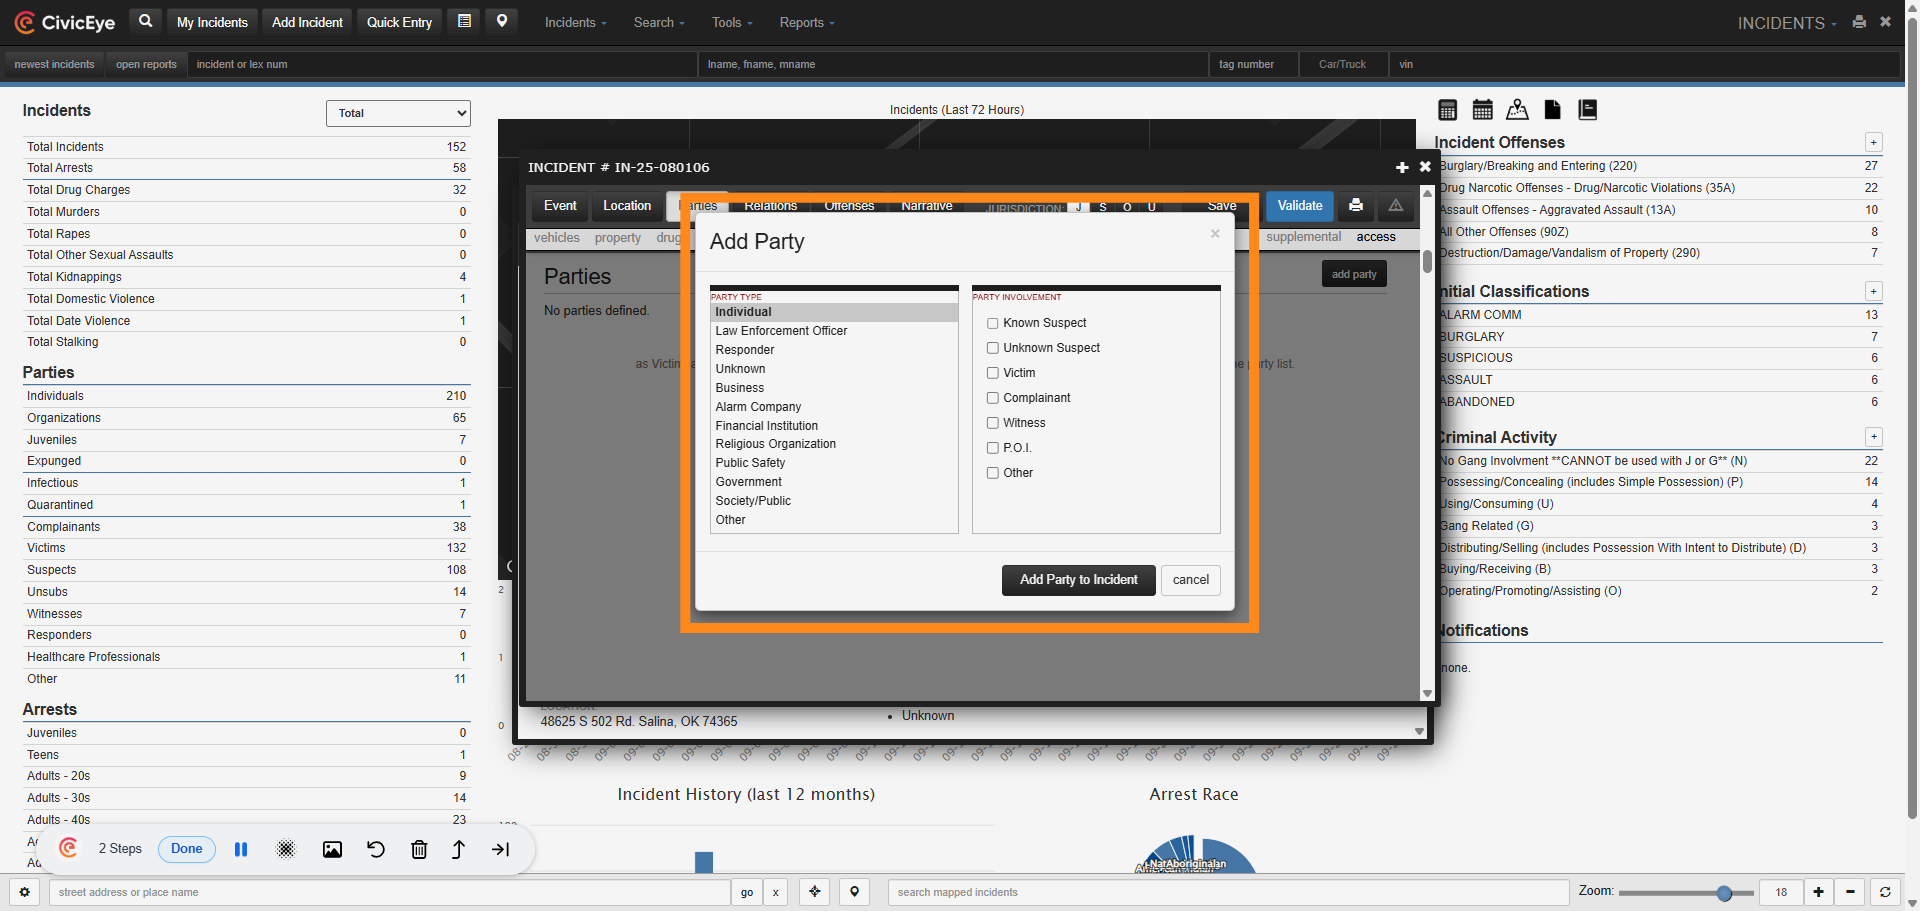
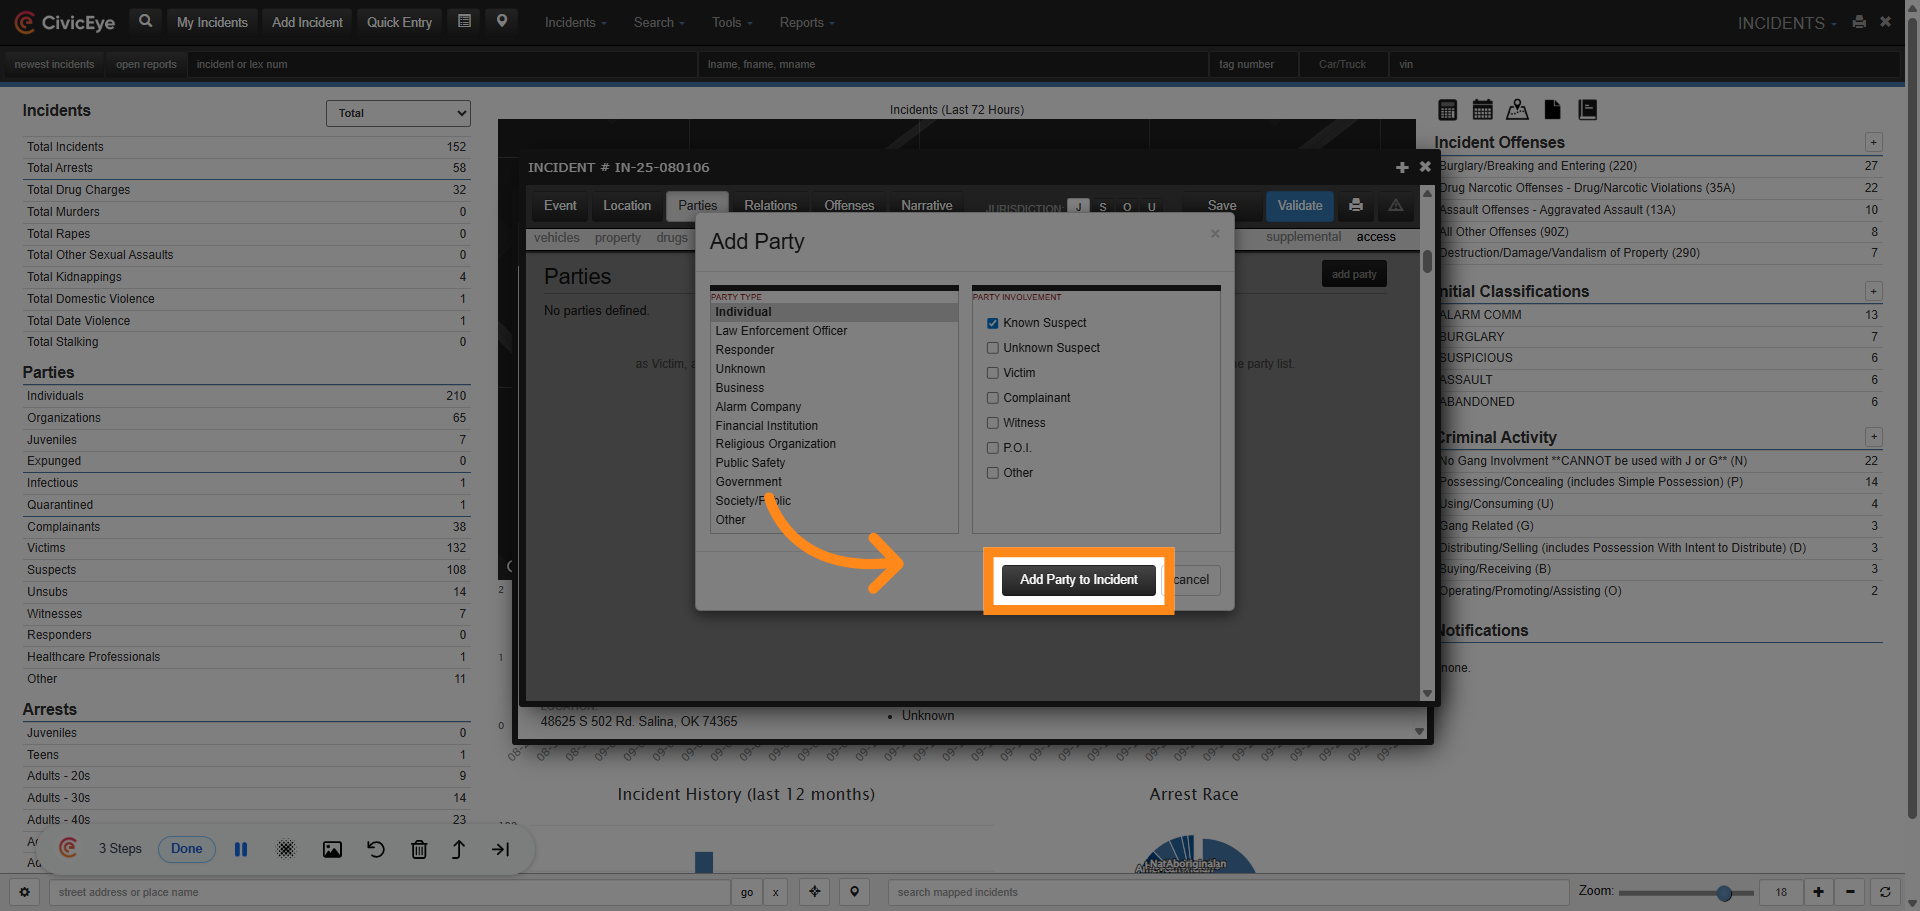
Selecting the add party tab open the add party frame. In this page the user identifies the party type and the party involvement. In this case we have selected individual as the party type, and known suspect as the party involvement.
### 5. Click "Add Party to Incident"
Select "Add Party to Incident" to open a party page to begin adding the known suspect information to the incident report.
### 6. Known Suspect
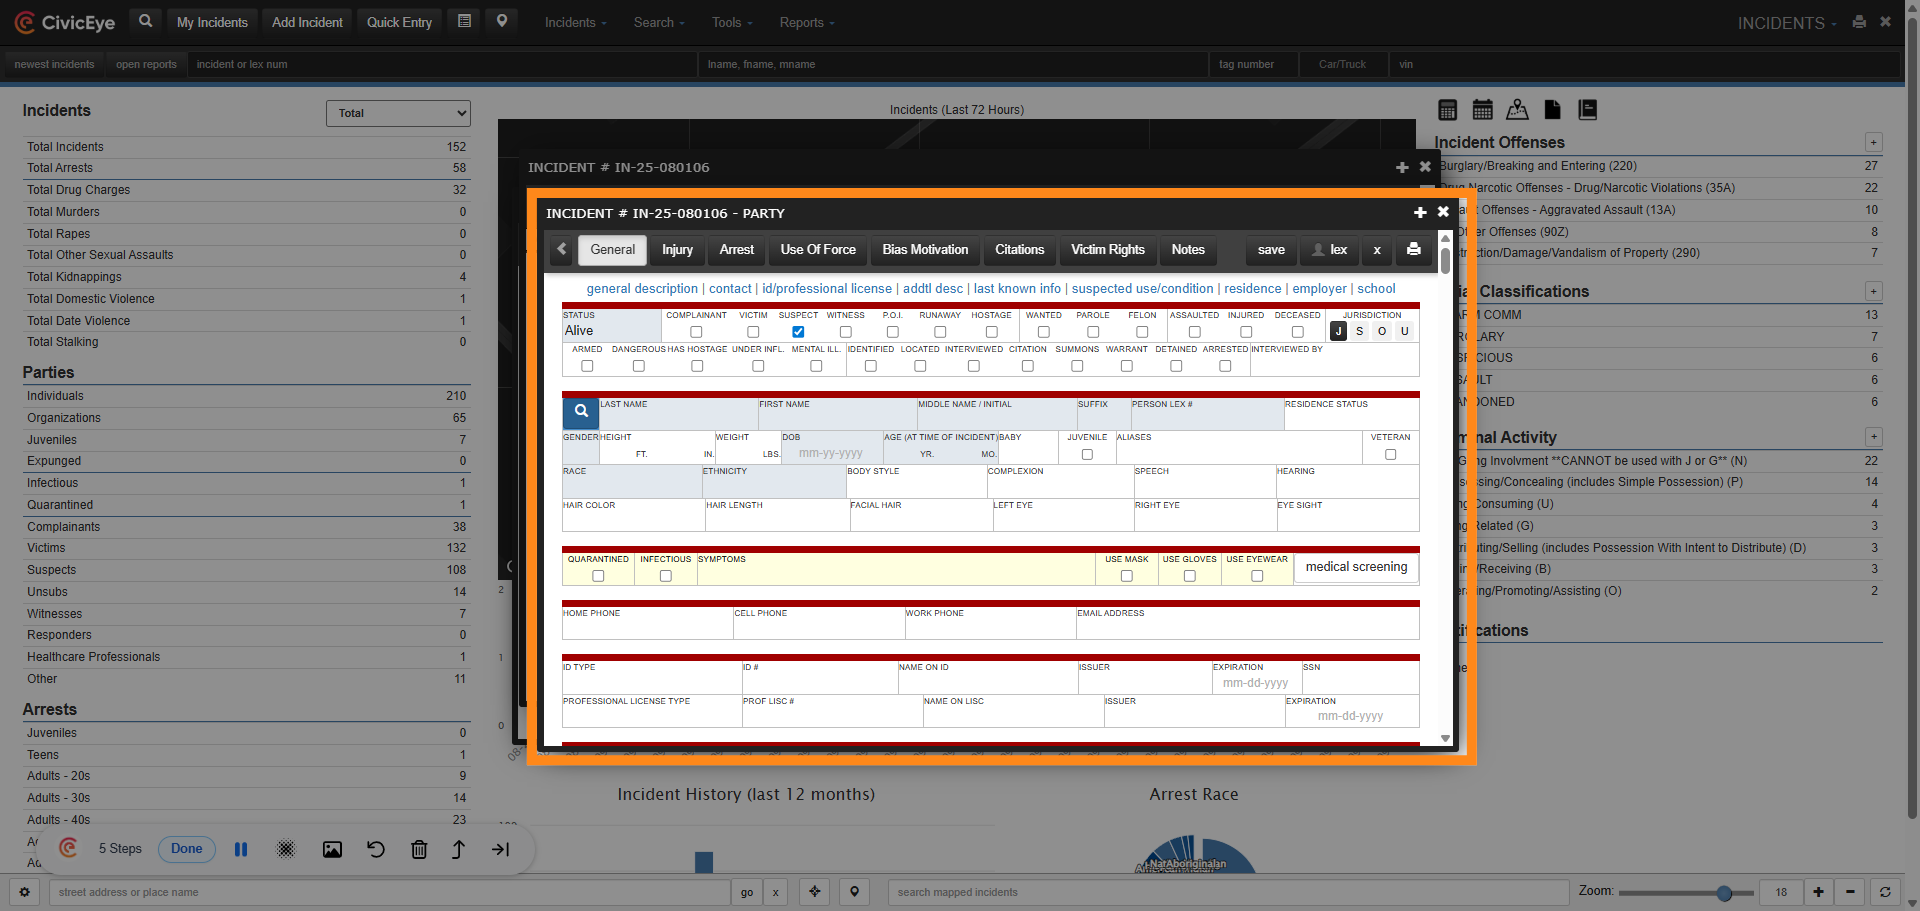
Selecting add party to incident has opened the known suspect party page.
### 7. Search the Master Name Index for the Suspect
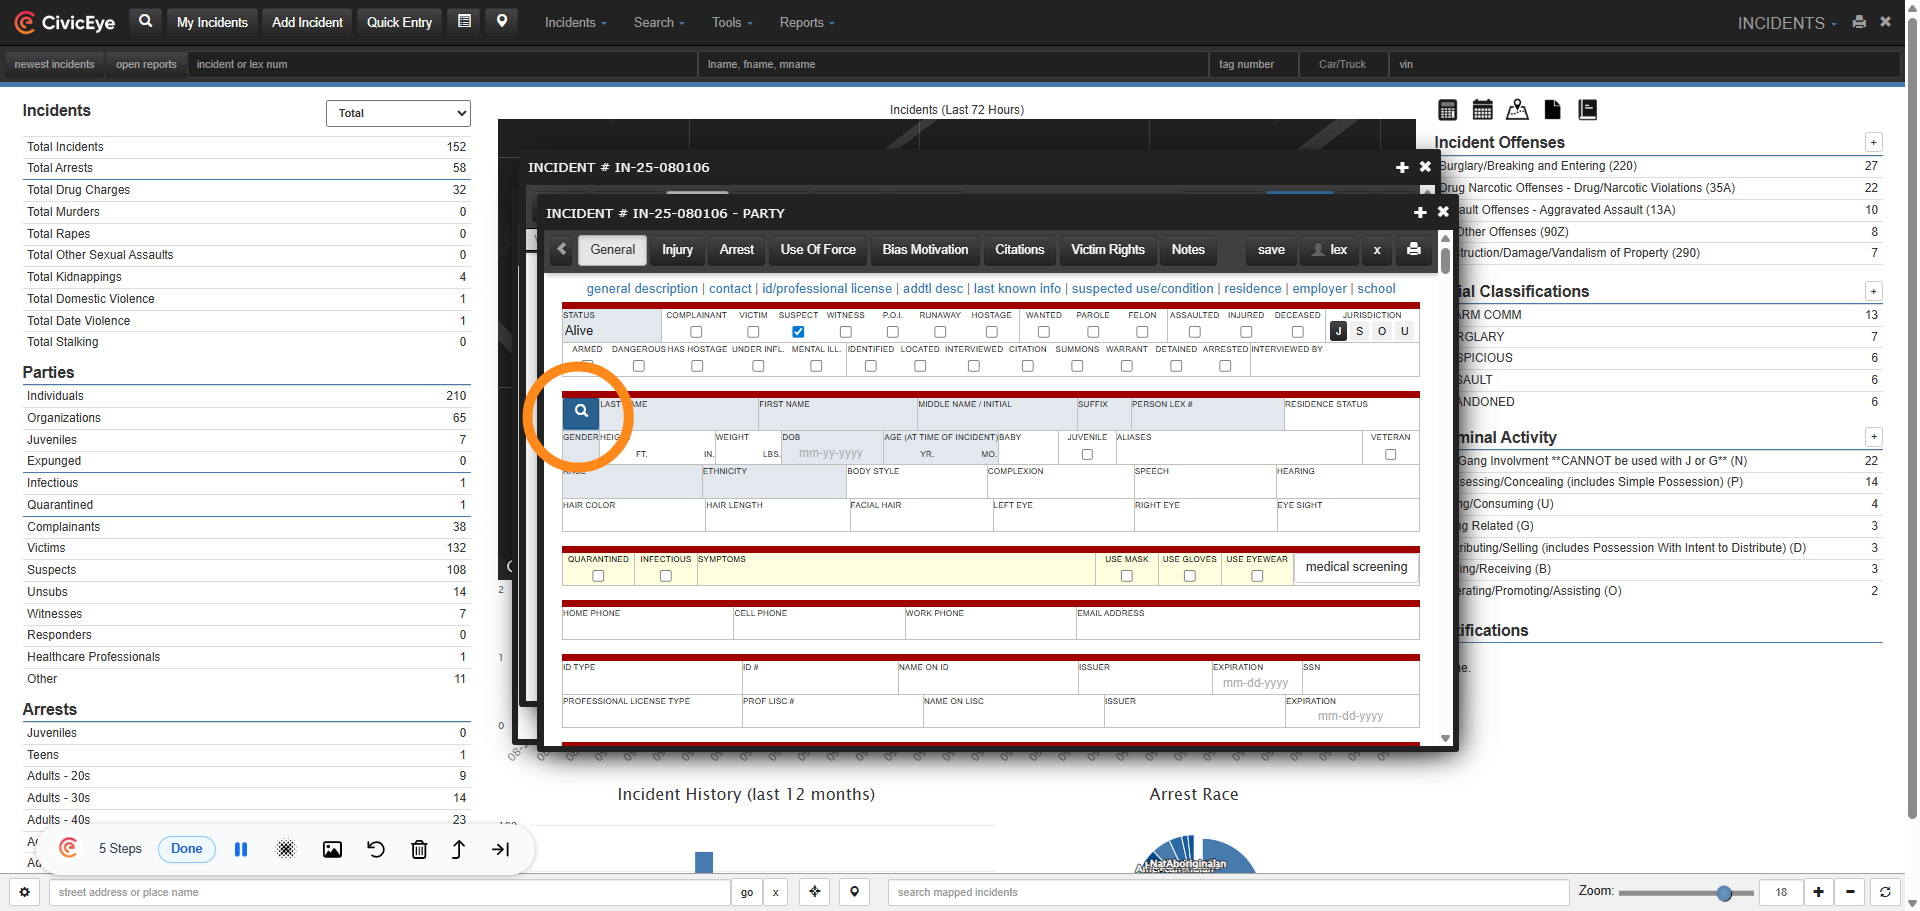
Always use information from the master persons, or name, index to add party information to an incident report. Do not type data directly into the boxes of the report. Typing data into the report does not permanently record the information to CivicRMS databases, and the information will not be searchable later. Begin adding suspect information by searching the master name index. Select the magnifying glass to open up the master name search.
### 8. Master Name Search
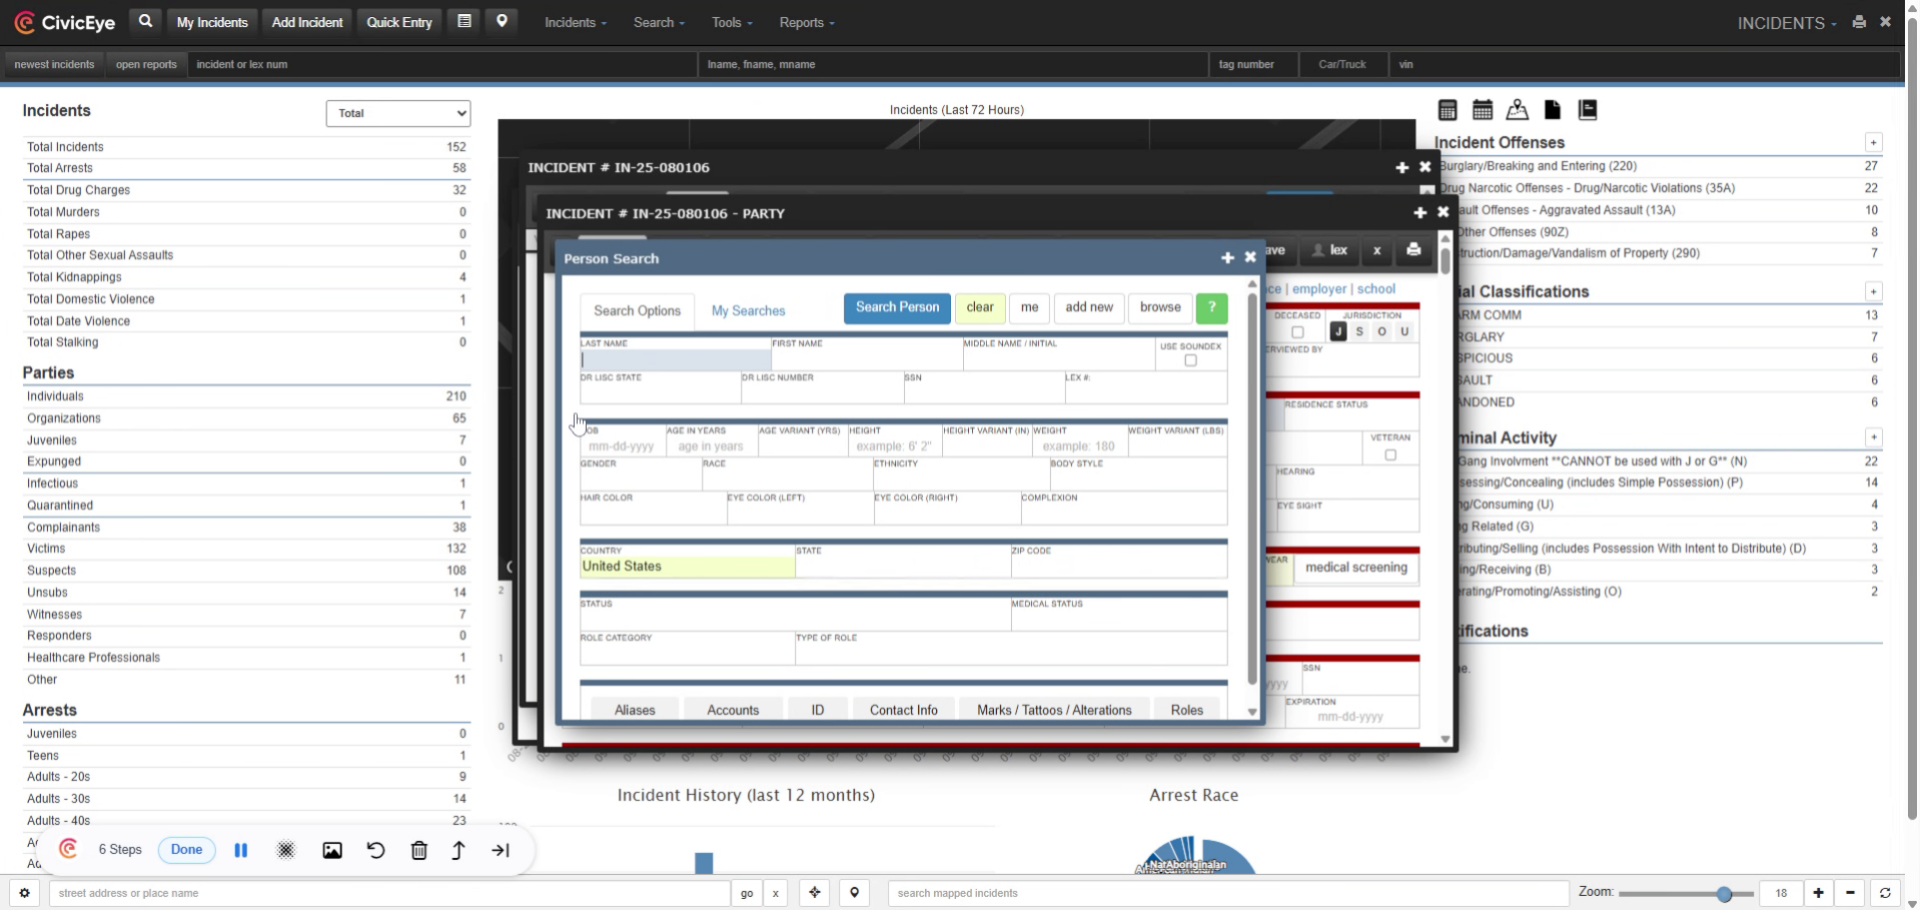
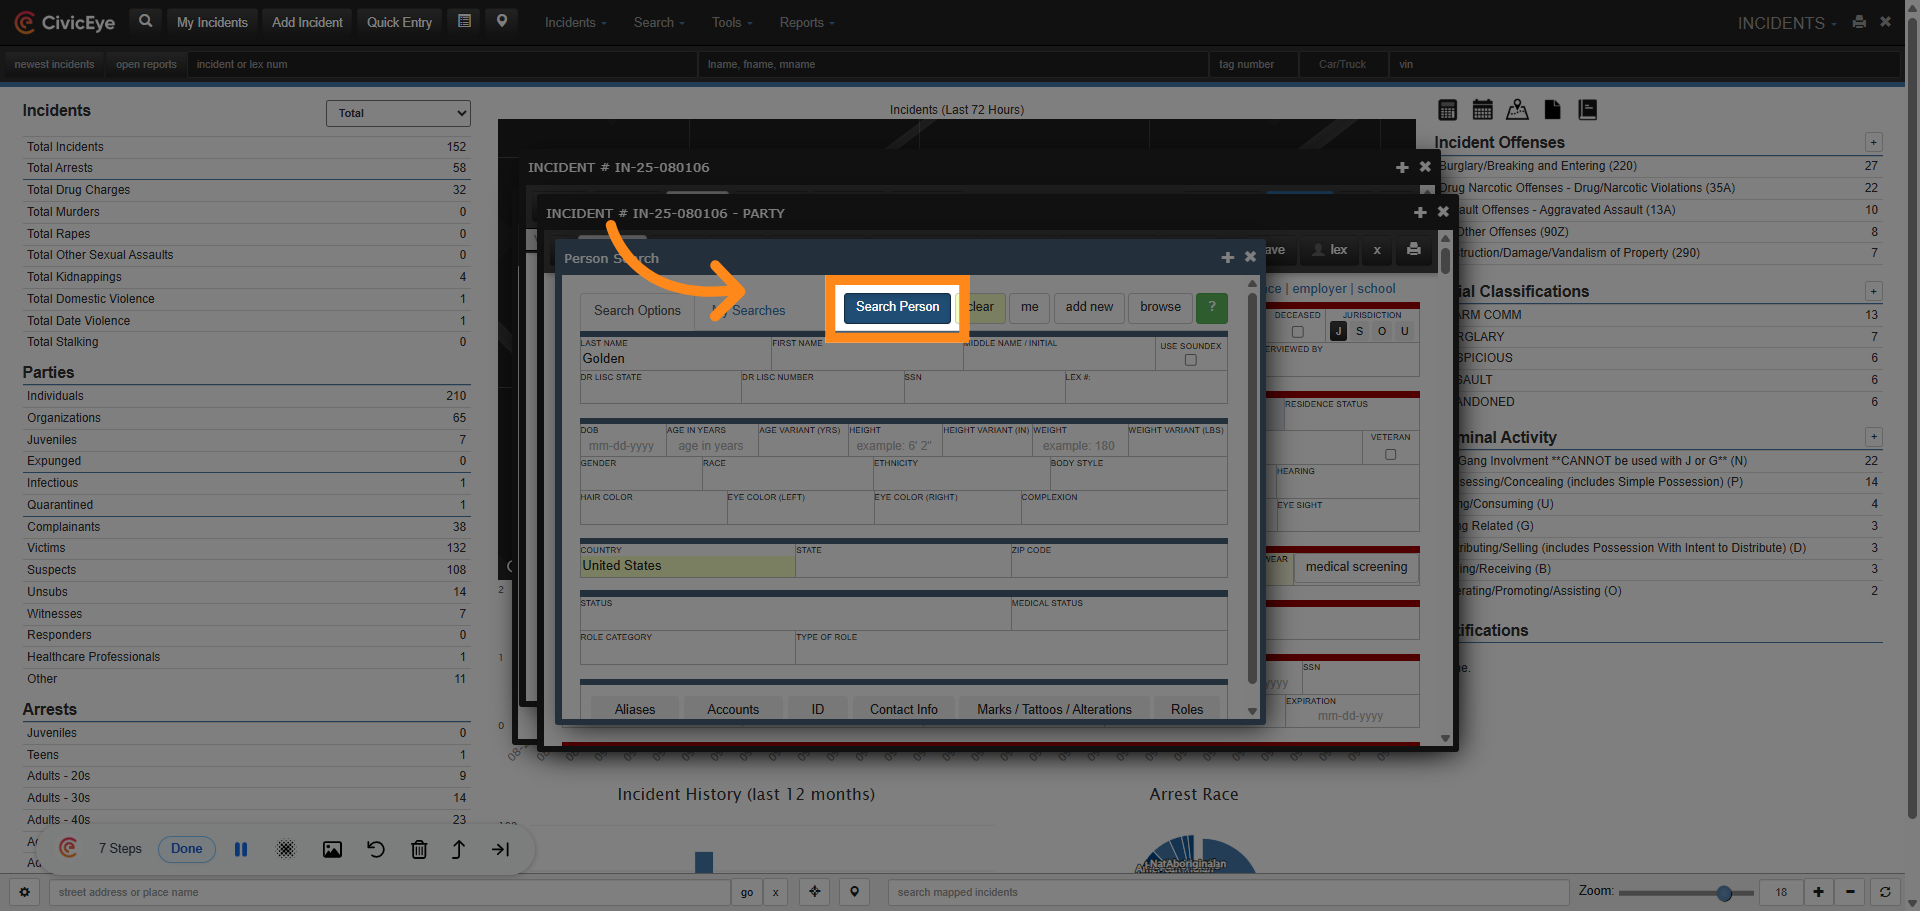
Selecting the magnifying glass opens the master name search. Enter the information you have on the suspect into this search.
### 9. Select "Search Person"
Click "Search Person" to initiate the search for the individual based on the entered information.
### 10. Select Suspect
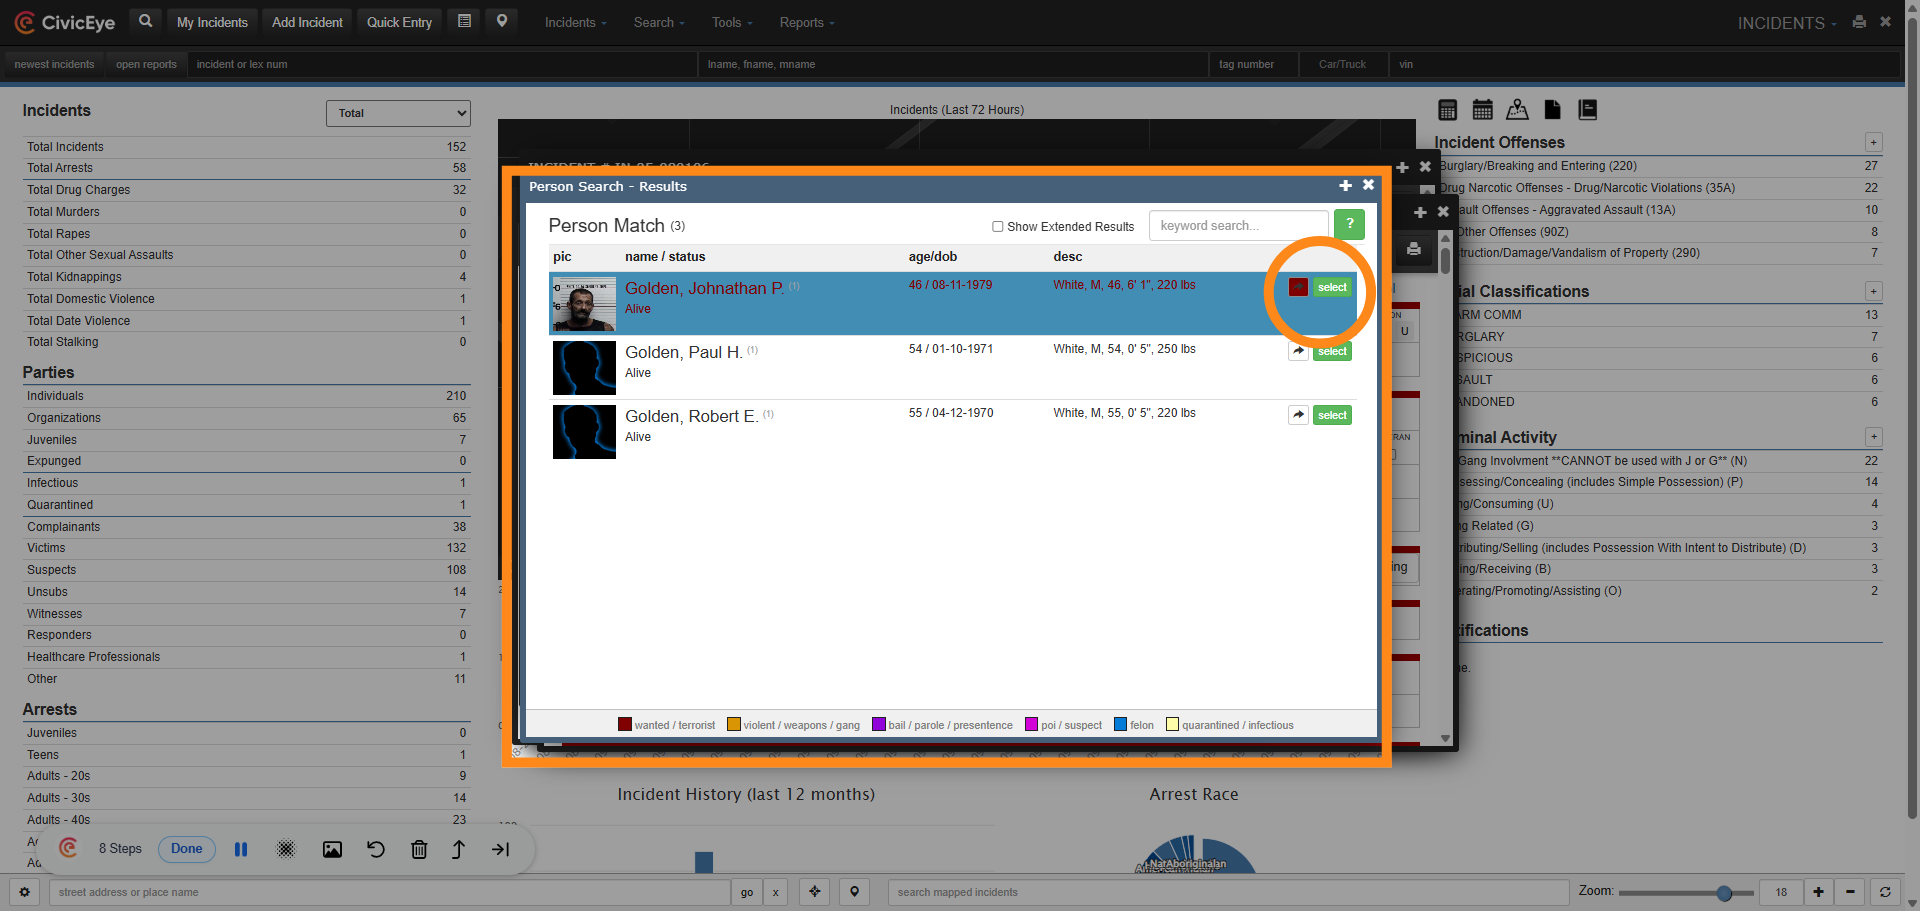
The persons search will provide results based on the search criteria added by the user. The user should always review the individuals master name listing to insure they have selected the correct suspect. When the user confirms the suspect is included in the results, select the person to add their master name data to the incident report.
### 11. Suspect Information
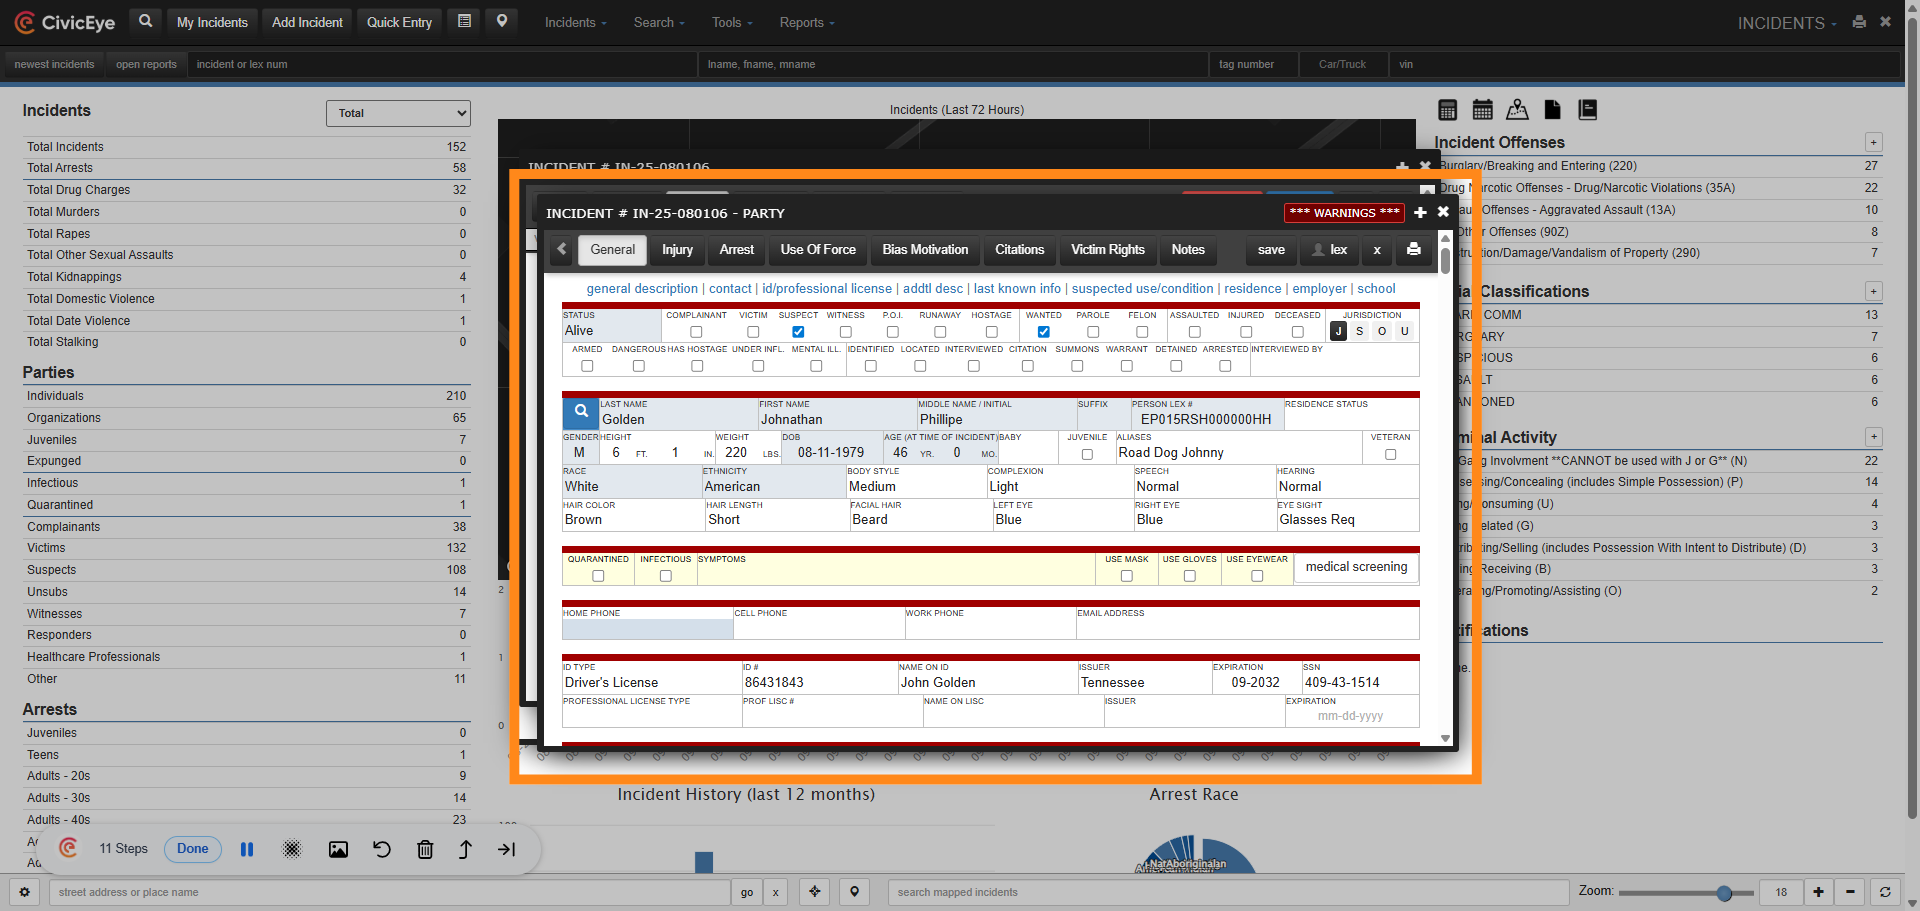
The suspects master name information is now added to the incident report. Remember to add phone numbers, and to review all identification, drivers license and social security number, information.
### 12. Additional Information
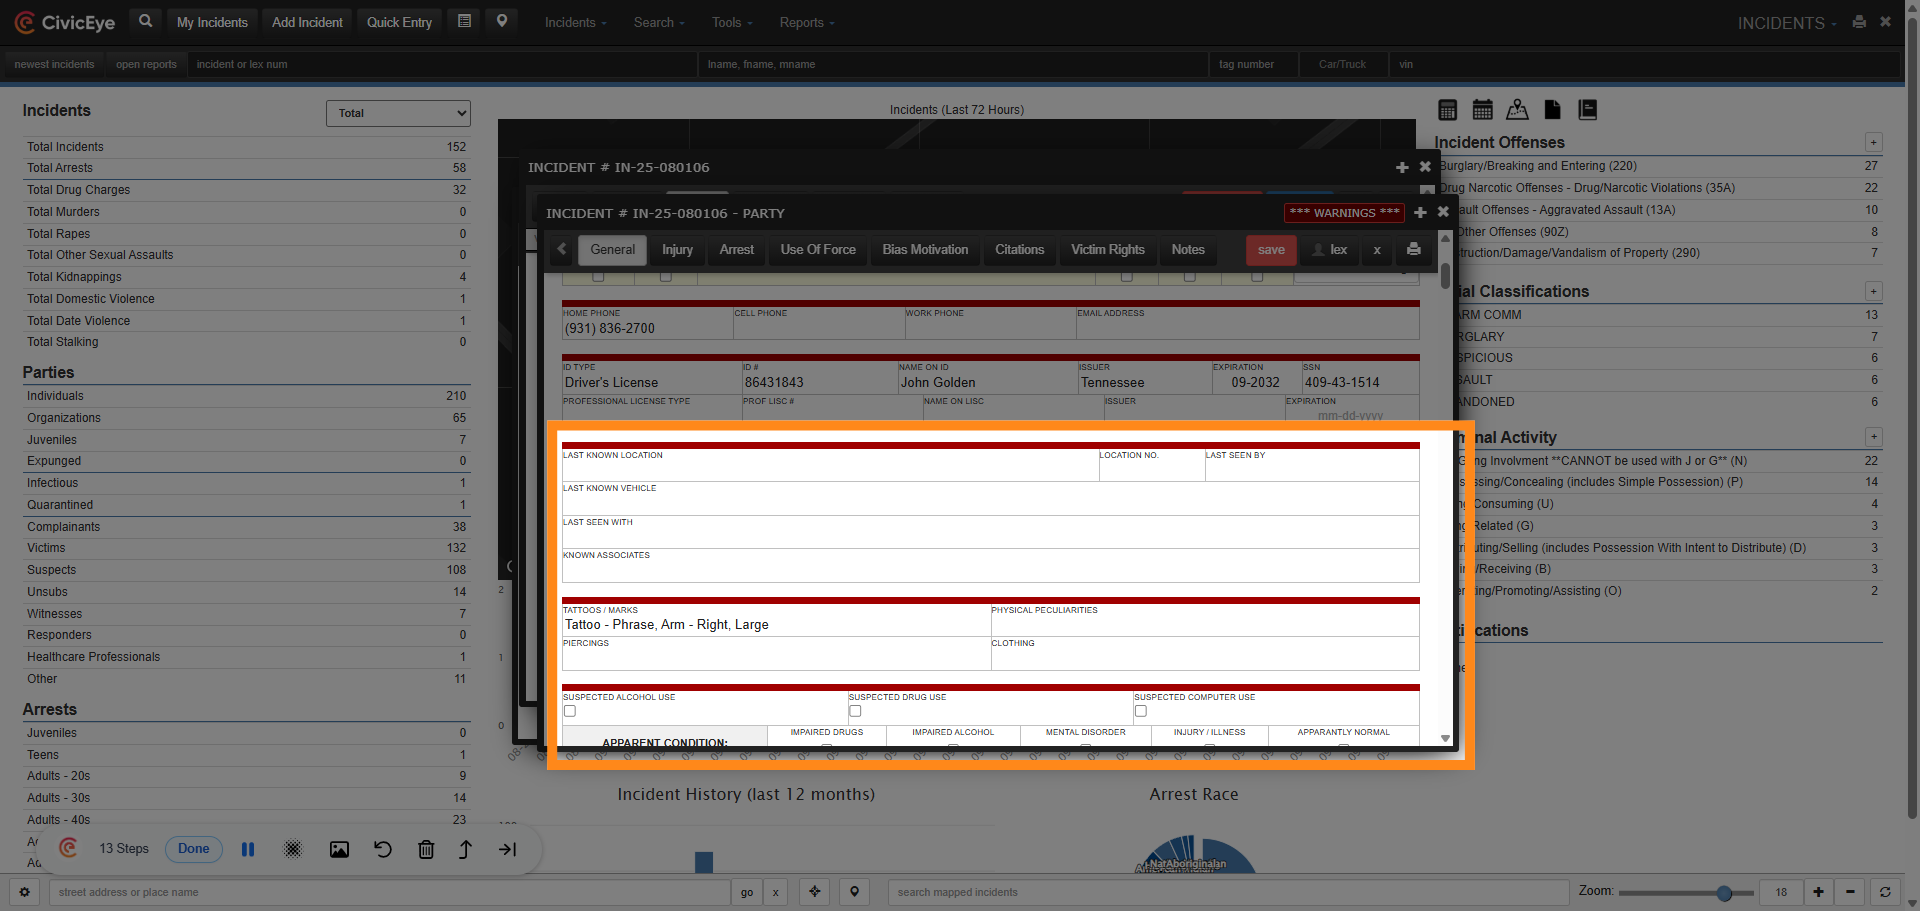
CivicRMS also provides free text areas to add vital investigative information, including suspect clothing, last known location, and suspect condition.
### 13. Residence, Employer, School
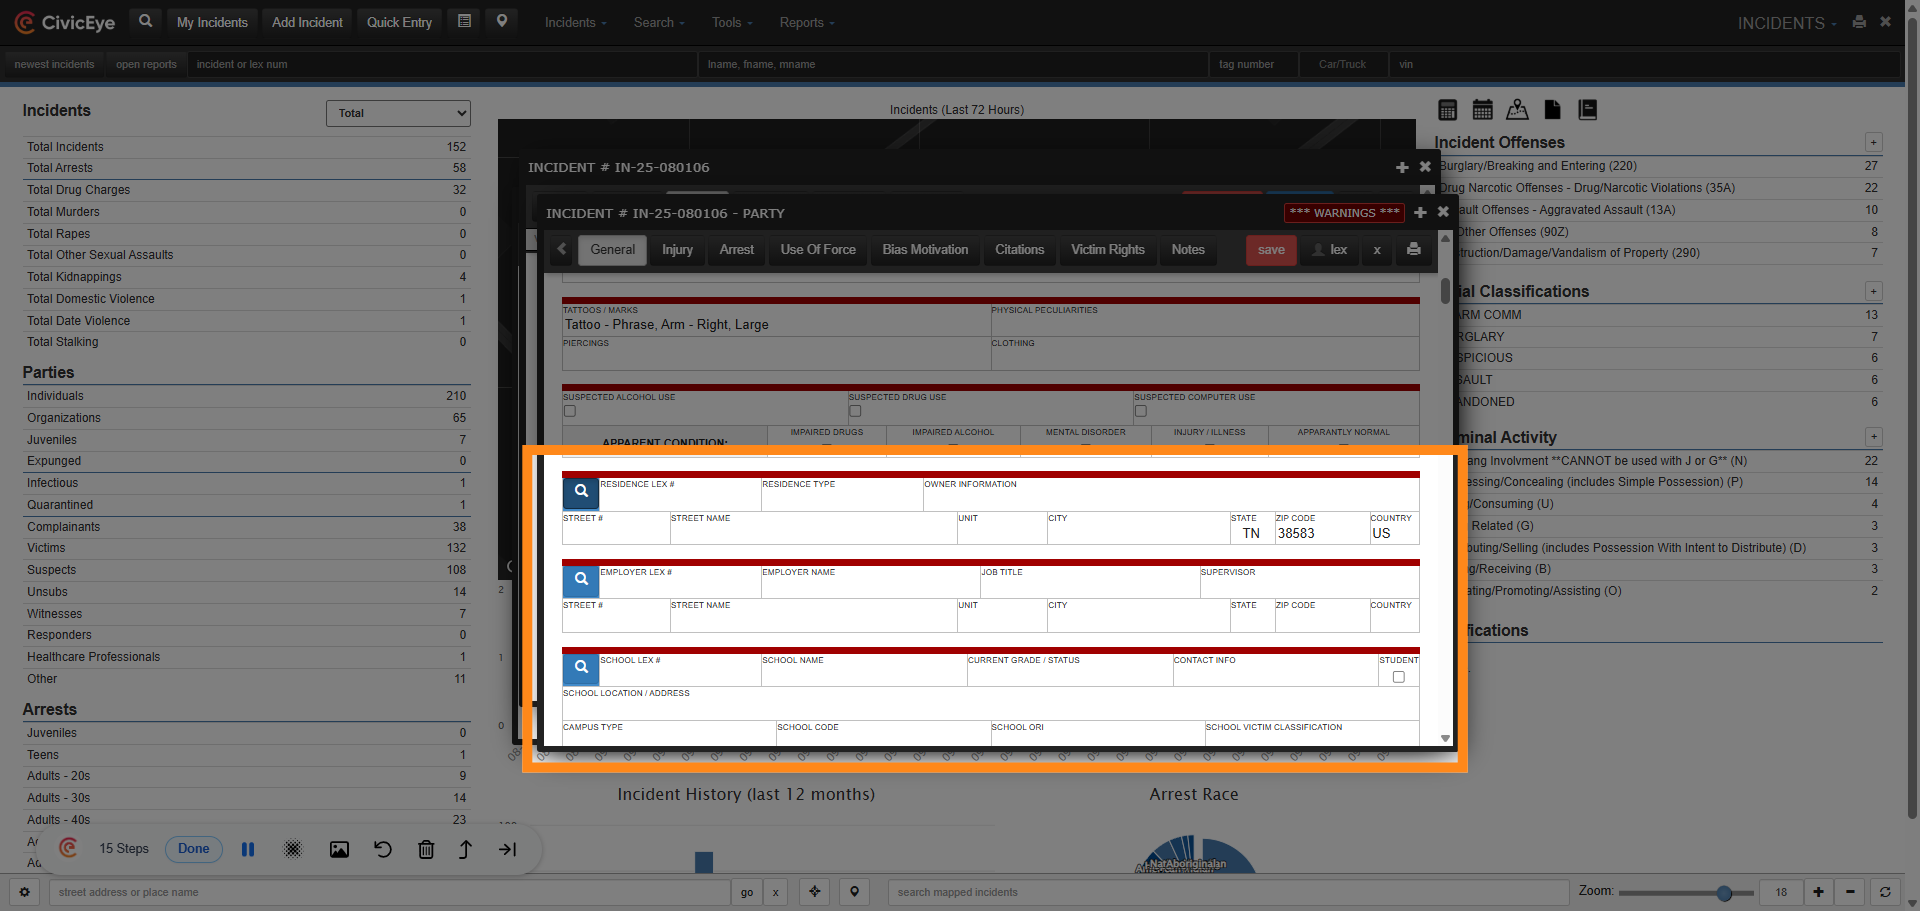
The party page also provides the user an area to document party residence, employer, and school. Each area is connected to a master index search by the magnifying glass.
### 14. Linked Data
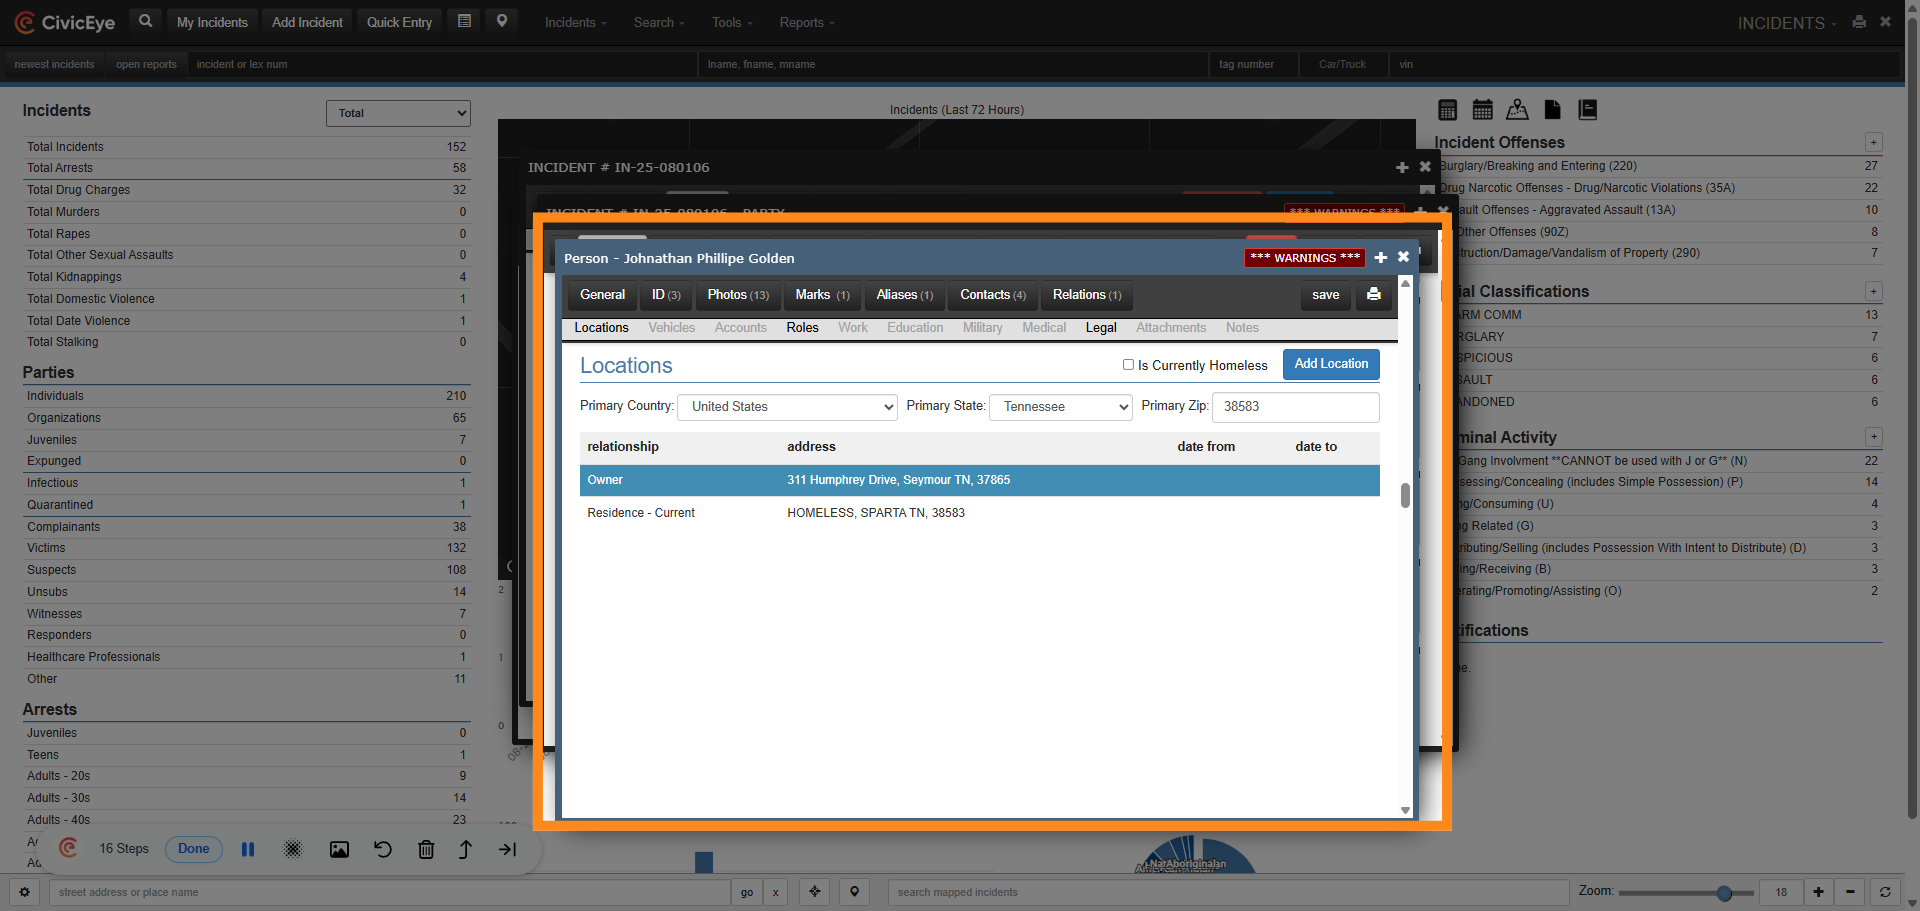
When utilizing the magnifying glass, CivicRMS first searches locations associated to the party in the master name index. This provides the user the fastest and most accurate search. If the party's current information is not linked, the user can add that information in the appropriate master index.
### 15. Select Save
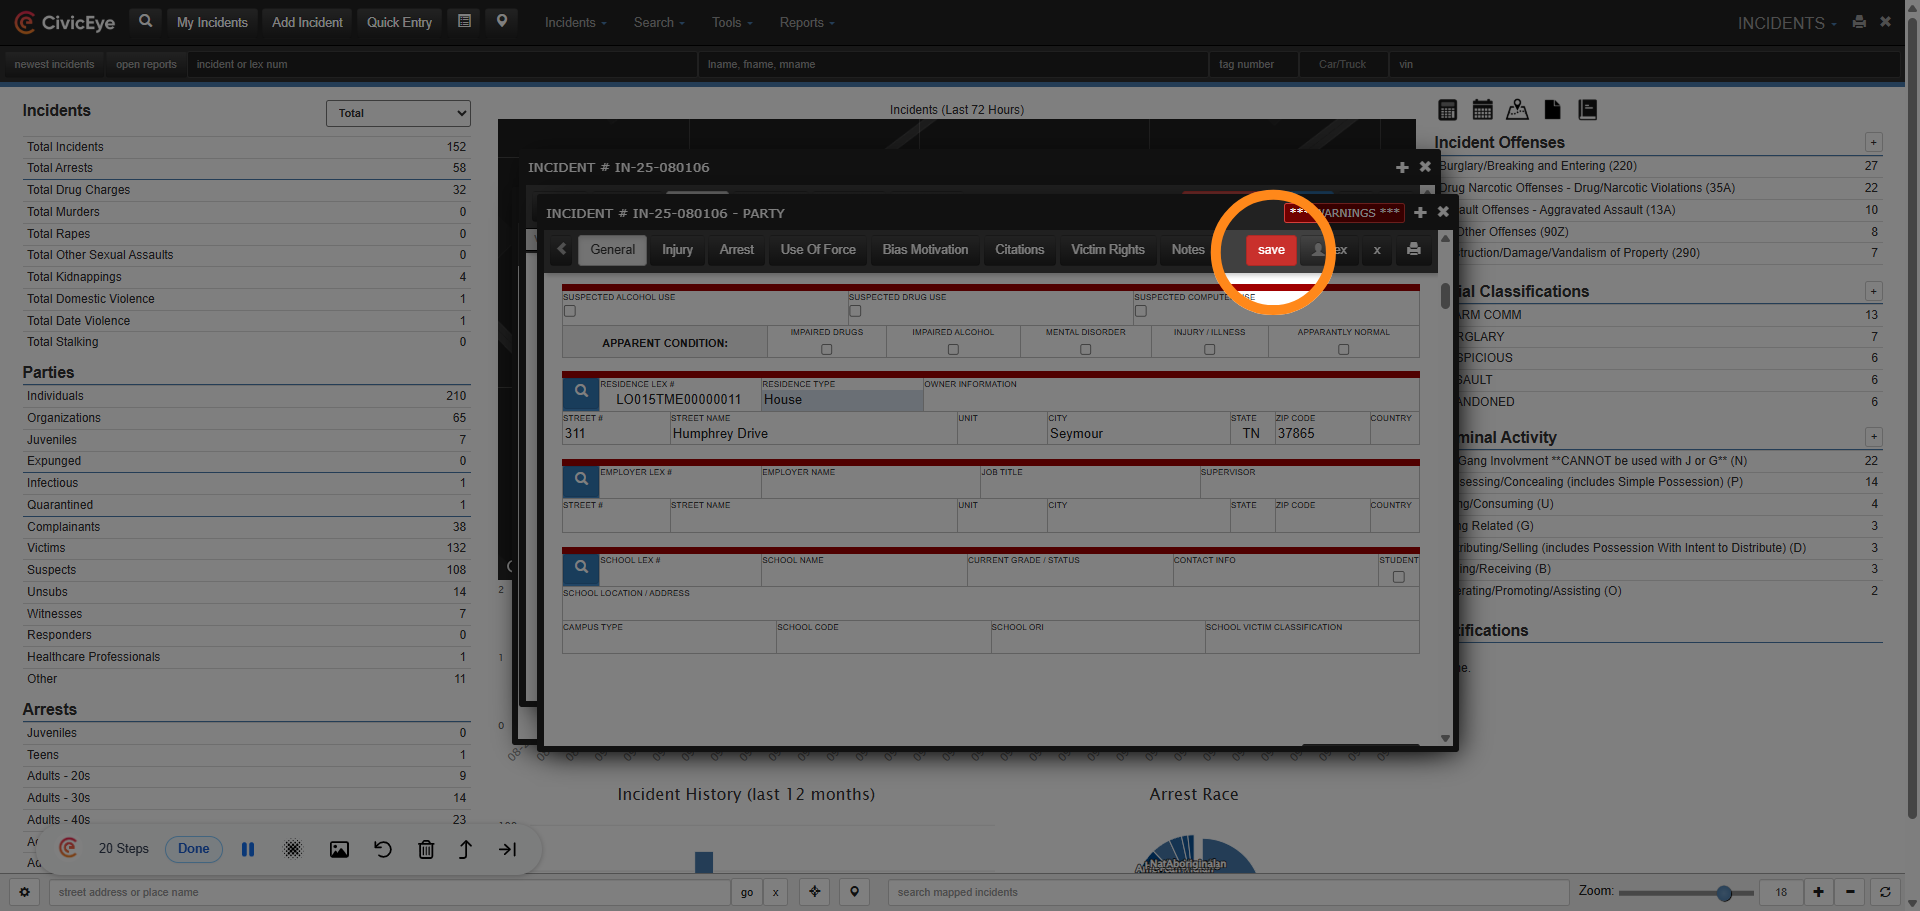
Remember, click save as data is added to the incident report to ensure your work is saved in the system.
### 16. Suspect Information
You have now added a known suspect to the incident report. Repeat this process for all other known parties within an incident, to include victims, complainants, and witnesses. CivicRMS will provide a default listing for society as a victim, and a default unknown suspect listing in the incident report.
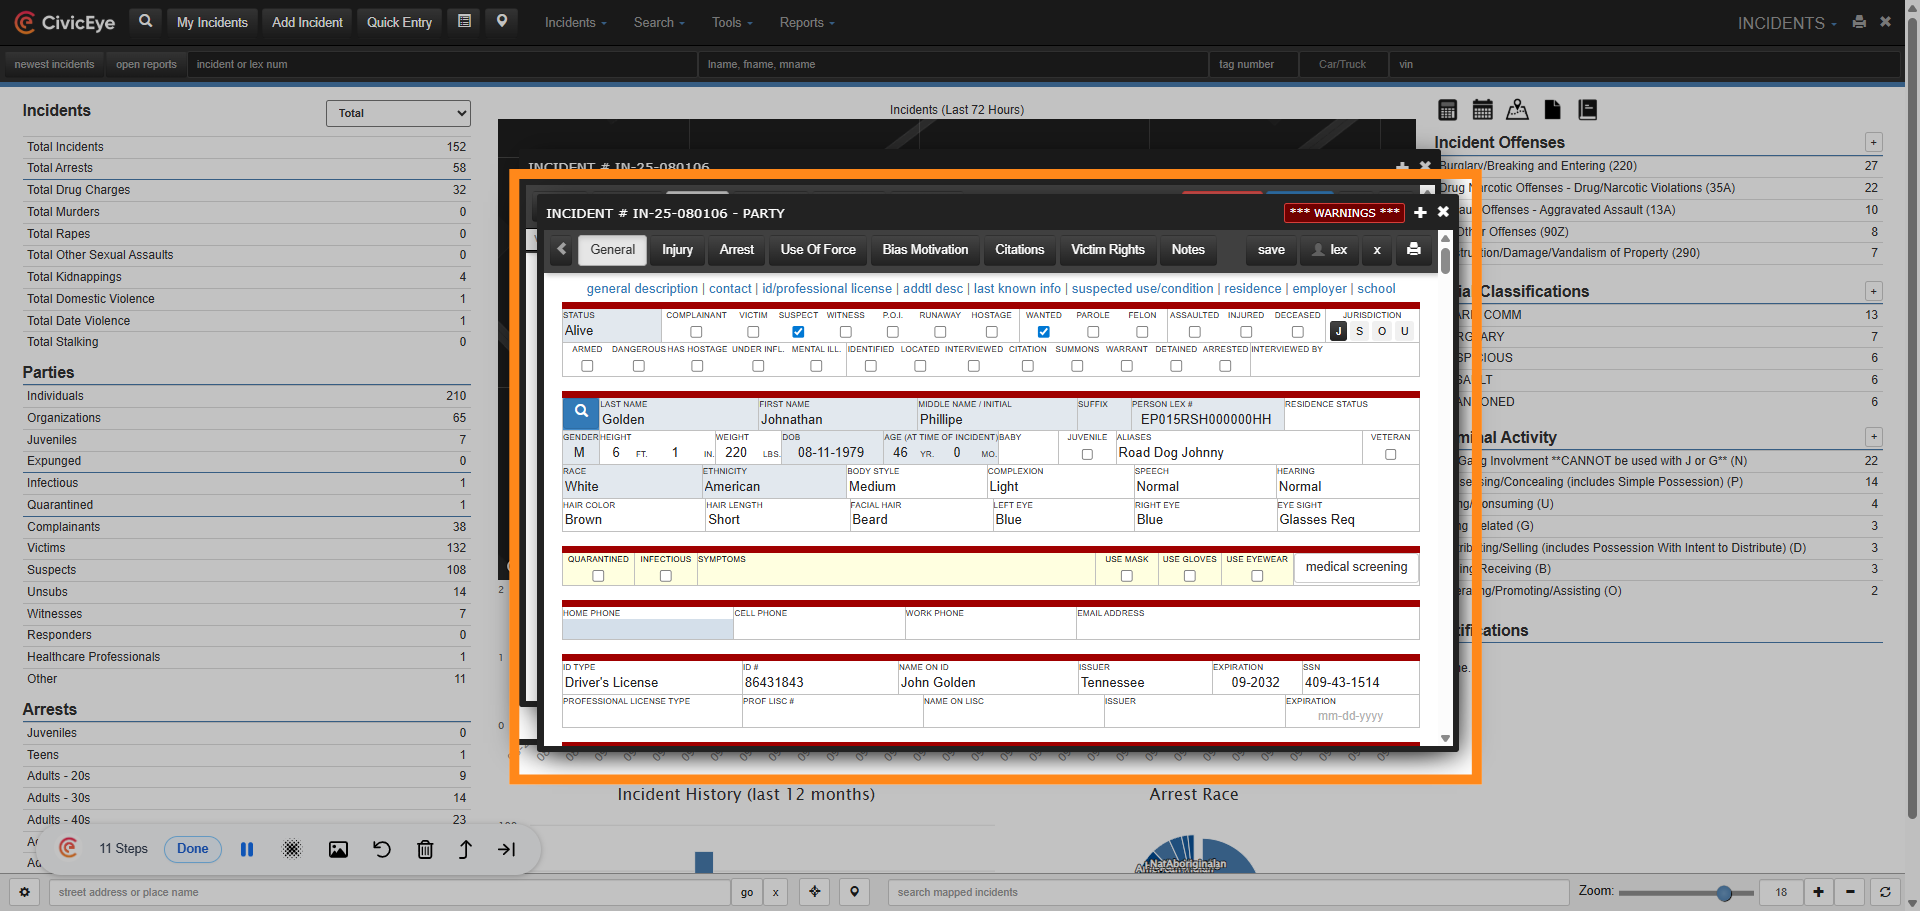
You have successfully added a party to the incident report by selecting the party type, searching and selecting the person, verifying contact and address details, and saving the information. For more information on this process, or other questions about CivicRMS, please call a client support manager at 877-778-5277, or email us at support@civiceye.com.
[Powered by **guidde**](https://www.guidde.com)
- [How to Request New Training Content](https://knowledgebase.civiceye.com/knowledge-base/how-to-request-new-training-content?hsLang=en)
- [CivicCase](https://knowledgebase.civiceye.com/knowledge-base/civiccase?hsLang=en#main-content)
- [Prosecutor and Admin Portals](https://knowledgebase.civiceye.com/knowledge-base/civiccase?hsLang=en#prosecutor-and-admin-portals)
- [CivicDocs](https://knowledgebase.civiceye.com/knowledge-base/civicdocs?hsLang=en#main-content)
- [Evidence Management](https://knowledgebase.civiceye.com/knowledge-base/civicdocs?hsLang=en#evidence-management)
- [User Access](https://knowledgebase.civiceye.com/knowledge-base/civicdocs?hsLang=en#user-access)
- [Defense Portal](https://knowledgebase.civiceye.com/knowledge-base/civicdocs?hsLang=en#defense-portal)
- [Law Enforcement Portal](https://knowledgebase.civiceye.com/knowledge-base/civicdocs?hsLang=en#law-enforcement-portal)
- [CivicRMS](https://knowledgebase.civiceye.com/knowledge-base/civicrms?hsLang=en#main-content)
- [Master Index](https://knowledgebase.civiceye.com/knowledge-base/civicrms?hsLang=en#master-index)
- [Incident Reports](https://knowledgebase.civiceye.com/knowledge-base/civicrms?hsLang=en#incident-reports)
- [NIBRS](https://knowledgebase.civiceye.com/knowledge-base/civicrms?hsLang=en#nibrs)
- [Property](https://knowledgebase.civiceye.com/knowledge-base/civicrms?hsLang=en#property)
- [Persons](https://knowledgebase.civiceye.com/knowledge-base/civicrms?hsLang=en#persons)
- [Arrest and Warrants](https://knowledgebase.civiceye.com/knowledge-base/civicrms?hsLang=en#arrest-and-warrants)
- [General](https://knowledgebase.civiceye.com/knowledge-base/civicrms?hsLang=en#general)
- [FAQs](https://knowledgebase.civiceye.com/knowledge-base/faqs?hsLang=en#main-content)
- [Support](https://knowledgebase.civiceye.com/knowledge-base/faqs?hsLang=en#support)
- [Training](https://knowledgebase.civiceye.com/knowledge-base/faqs?hsLang=en#training)
- [Support](https://knowledgebase.civiceye.com/knowledge-base/support?hsLang=en#main-content)
- [User Access / Permissions](https://knowledgebase.civiceye.com/knowledge-base/support?hsLang=en#user-access-permissions)
- [Getting started](https://knowledgebase.civiceye.com/knowledge-base/getting-started?hsLang=en#main-content)
- [CivicEye Personnel Module](https://knowledgebase.civiceye.com/knowledge-base/getting-started?hsLang=en#civiceye-personnel-module)
[.png?width=250&height=99&name=CivicEye_Identity_Secondary%20(4).png)](https://knowledgebase.civiceye.com/?hsLang=en)
The Platform for Public Safety
[mailto:help@civiceye.com](mailto:help@civiceye.com)
Copyright © 2025, CivicEye